Appendix A : Transaction Parameters
The Customer Service screen’s Maintenance sub tab enables you to post an array of monetary and nonmonetary transactions for any given account. The transactions that are available depend on responsibility of the Oracle Financial Services Lending and Leasing user, nature of account, and whether the account is a Lease.
Appendix A : This appendix catalogues the baseline transaction codes and parameters available on Customer Service screen’s Maintenance sub tab. Instructions on how to use the Maintenance sub tab are located in Customer Service chapter of this User Guide.
A.1 Monetary Transactions
This section catalogues the transaction codes and parameters required to complete the following monetary tasks for Lease:
- Apply, adjust, or waive servicing expenses
- Adjust or waive late charges
- Adjust or waive nonsufficient funds
- Apply, adjust, or waive repossession expenses
- Apply, adjust, or waive bankruptcy expenses
- Apply or adjust phone pay fees
- Change an index/margin rate
- Apply, adjust, or cancel financed insurance
- Generate a payoff quote
- Payoff an account
- Charge-off an account/Do Not Charge-Off an account
- Close an account
- Apply, adjust, or waive an extension fee
- Adjust or waive a prepayment penalty
- Reschedule an escrow payment
- Adjust or waive an escrow payment
- Adjust or waive a payoff quote fee
- Place an account in a nonperforming condition
- Reverse a nonperforming condition
- Reschedule precomputed Lease to interest bearing Lease
- Change profit rate
- Refunding the payment
- Non Refund GL
- ACH Fee Maintenance
- Adjust, charge-off, or waive the advance/principal balance
- Adjust the interest balance
- Stop interest accrual
- Indicate a borrower as on or off active military duty
- Trading of Accounts - Monetary Transactions
- Billing Cycle Change
- Capitalization Maintenance
- Fee Consolidation Maintenance
- Cycle Based Late Fee Adjustment / Waiver
- Change Lease Payment Amount
- Lease Extension
- Change Lease Term
- Lease Security Deposit Adjustment
- Lease Fee Usage Adjustments
- Evergreen Lease Transaction
- Lease Rental/Damage Fee Adjustments
- Account Settlement Transaction
- Accrual and First Payment Date Maintenance
Note
- While posting any monetary transaction that results in increase of account maturity date, system auto validates if the same is within the 'Customer Credit Limit Expiry date' of any one or all of the customer(s)/business who contributed for funding the Account. In case it is greater, system displays an error indicating that the resulting Maturity date is greater than 'Customer Credit Limit Expiry date' and does not allow to post the transaction.
- OFSLL does not allow to post any monetary transaction on/or prior to the status change date. However, in case if the ACH gets the payment return file with NSF (no-sufficient funds) payment status - where the account status is ‘PAID OFF’, system automatically reverses the PAID OFF status and posts the NSF transaction on account.
A.1.1 Late Charges
![]()
Late charges occur when payment is not made within the grace period or by the day after payment is due. The due date is determined by the contract.
Late charges appear in LC Due field on the Dues section of Summary tab of the Customer Service screen. This is the first screen to appear on the Customer Service screen when you load an account.
To adjust a late charge
![]()
Transaction |
Parameters |
Adjustment To Late Charge - Add |
Txn Date Amount |
Adjustment To Late Charge - Subtract |
Txn Date Amount |
To waive a late charge
Transaction |
Parameters |
Waive Late Charge |
Txn Date Amount |
A.1.2 Nonsufficient Fund Fees
Nonsufficient fund fees are posted when a payment does not cover the amount owed. The fee that the system automatically applies to an account is recorded during setup.
Nonsufficient fund fees appear in the NSF Due field on the Dues section of Summary tab of Customer Service screen. This is the first screen to appear on the Customer Service screen when you load an account.
To adjust a nonsufficient funds
![]()
Transaction |
Parameters |
Adjustment To Nonsufficient Fund Fee - Add |
Txn Date Amount |
Adjustment To Nonsufficient Fund Fee - Subtract |
Txn Date Amount |
To waive a nonsufficient funds
Transaction |
Parameters |
Waive Nonsufficient Fund Fee |
Txn Date Amount |
A.1.3 Repossession Expenses
Repossession expenses include any costs incurred while obtaining the asset, including legal fees or storage costs.
Repossession expenses appear in Other Due field on the Dues section of the Summary tab of Customer Service screen. This is the first screen to appear on the Customer Service screen when you load an account.
![]()
The adjustments will also appear in the corresponding column of Customer Service screen’s Account Balances screen for expense repossession/foreclosure Balance Type-- Waived, Charged Off, Adjusted (-), or Adjusted (+) -- depending on which of the following transactions you perform.
To post a repossession expense
![]()
Transaction |
Parameters |
Repossession Expenses |
Txn Date Amount |
To adjust a repossession expense
Transaction |
Parameters |
Adjustment To Repossession Expenses - Add |
Txn Date Amount |
Adjustment To Repossession Expenses - Subtract |
Txn Date Amount |
To waive a repossession expense
Transaction |
Parameters |
Waive Repossession Expenses |
Txn Date Amount |
A.1.4 Bankruptcy Expenses
Bankruptcy expenses include any costs incurred when an account holder declares bankruptcy, such as legal fees or additional collection costs.
Bankruptcy expenses appear in the Other Due field on the Dues section of Summary tab of Customer Service screen. This is the first screen to appear on the Customer Service screen when you load an account.
![]()
The adjustments will also appear in the corresponding column of Customer Service screen’s Account Balances screen for expense bankruptcy Balance Type-- Waived, Charged Off, Adjusted (-), or Adjusted (+) -- depending on which of the following transactions you perform.
To post a bankruptcy expense
![]()
Transaction |
Parameters |
Legal Bankruptcy Expenses |
Txn Date Amount |
To adjust a bankruptcy expense
Transaction |
Parameters |
Adjustment To Bankruptcy Expenses - Add |
Txn Date Amount |
Adjustment To Bankruptcy Expenses - Subtract |
Txn Date Amount |
To waive a bankruptcy expense
Transaction |
Parameters |
Waive legal Bankruptcy Expenses |
Txn Date Amount |
A.1.5 Phone Pay Fees
Phone pay fees are where a borrower calls the lender and arranges for a debit to their checking or savings account to make a payment on a Lease account.
Phone pay fees appear in Other Due field on Dues section of the Summary tab of Customer Service screen. This is the first screen to appear on the Customer Service screen when you load an account.
![]()
To adjust a phone pay fee
Transaction |
Parameters |
Adjustment to Phone Pay Fee - Add |
Txn Date Amount |
Adjustment to Phone Pay Fee - Subtract |
Txn Date Amount |
To waive a phone pay fee
Transaction |
Parameters |
Waive Phone Pay Fee |
Txn Date Amount |
A.1.6 Financed Insurances
In this section, you can do the following:
A.1.6.1 Insurance Addition
You can add financed insurance to an existing account with the INSURANCE ADDITION transaction. This transaction adds insurance premium amount to advance/principal balance on the Lease and adjusts the Lease receivables accordingly. The transaction also triggers the process to re-compute repayment amount for Lease. After you post the transaction Lease will be billed for newly computed payment amount and will be considered for delinquencies and fees calculations based on information on the Contract link’s Contract screen. The newly added insurance information can be viewed on Customer Service drop-down link’s Insurances link.
![]()
To add financed insurance
Transaction |
Parameters |
Insurance addition |
Txn Date |
Insurance Type |
|
Single/Joint |
|
Insurance Mode |
|
Insurance Plan |
|
Company Name |
|
Phone #1 |
|
Extn #1 |
|
Phone #2 |
|
Extn #2 |
|
Policy # |
|
Policy Effective Date |
|
Premium Amount |
|
Expiration Date |
|
Primary Beneficiary |
|
Secondary Beneficiary |
|
Comment |
A.1.6.2 Insurance Rebate Quote
OFSLL supports the option to generated an insurance rebate quote to derive the rebate amount for all the active funded Insurances before cancelling an Insurance.
You can generate a rebate quote by posting the monetary transaction ‘COMPUTE INSURANCE REBATE QUOTE (LEASE)’ on an existing account in the Customer Service > Maintenance screen.
Transaction |
Parameters |
COMPUTE INSURANCE REBATE QUOTE (LEASE) |
PAYOFF QUOTE VALID UPTO DATE |
INSURANCE TYPE |
|
|
The same transaction can also be posed to generate a backdated / future dated Insurance Rebate quote.
Note the following:
- Insurance Rebate quote can also be generated on premium amount for funded insurance (specified in Origination > Funding > Contract > Insurances) while originating Lease applications.
The Rebate amount is displayed in Results section of Maintenance screen.
A.1.6.3 Insurance Cancellation
You can cancel financed insurance on an existing account with the INSURANCE CANCELLATION transaction. When you post this transaction, the system computes premium refund amount based on the refund method associated with insurance item.
To cancel a financed insurance
Transaction |
Parameters |
Insurance Cancellation |
Txn Date |
Insurance Type |
|
Policy Effective Date |
|
Insurance Refund Amount |
|
Cancellation Reason |
|
Current Usage |
If you enter a value for INSURANCE REFUND AMOUNT parameter, the system overrides calculated refund amount and adjusts advance/principal balance and Lease receivables accordingly. The INSURANCE CANCELLATION transaction re-computes the repayment amount for Lease based on remaining balances. After posting the transaction, Lease will be billed for newly computed payment amount according information on the Contract tab’s Contract sub tab. The insurance cancellation information can be viewed on the Contract link’s Insurances sub screen.
Also if you enter a value for ‘Current Usage’, system computes the rebate amount using the 'Pro Rata (Mileage) method. However system also calculates the rebate amount using ‘Refund Calculation Method' and considers the minimum value out of both.
A.1.6.4 Insurance Modification
You may rectify possible errors resulting from incorrect information entered on the INSURANCE ADDITION transaction (such as an incorrect premium account) with the monetary transaction INSURANCE MODIFICATION.
When you post the INSURANCE MODIFICATION transaction, Oracle Financial Services Lending and Leasing re-computes the repayment amount using new premium amount and adjusts advance/principal balance on Lease and Lease receivables.
To modify financed insurance information
Transaction |
Parameters |
Insurance Modifications |
Txn Date |
Insurance Type |
|
Policy Effective Date |
|
Premium Amount |
A.1.7 Index/Margin Rates
You can change the current Index Rate type (i.e. Prime Rate or Flat Rate) and increase or decrease or even replace the current Margin Rate of a variable rate Lease up to the required basis points using the INDEX / MARGIN RATE CHANGE monetary transaction. However, changing the depreciation rate or margin rate is supported only for ‘Interest Rate’ type of lease calculation method.
To change an index/margin rate
Transaction |
Parameters |
INDEX / MARGIN RATE CHANGE |
TXN DATE - Select the date from adjoining calendar. |
INDEX - Select from the drop-down list as either Prime Rate or Flat Rate. |
|
MARGIN RATE - Specify the Margin Rate. |
|
REASON - Specify additional information (if any). |
|
TXNS ADJUSTMENT TYPE - Select one of the following transaction adjustment type from the drop-down list: ACTUAL - Select this option to replace the existing Margin Rate with the current specified Margin Rate. INCREASE - Select this option to add the current specified Margin Rate to the existing Margin Rate. DECREASE - Select this option to reduce the current specified Margin Rate from the existing Margin Rate. However, note that reduction is permitted only up to existing Margin Rate and system displays an error if the current specified Margin Rate is greater than the existing Margin Rate. |
|
AUTO POST CHANGE PAYMENT - Select either YES or NO from the drop-down list. If there is a change in Margin Rate and this option is selected as YES, then system automatically posts CHANGE PAYMENT AMOUNT transaction along with RATE CHANGE transactions on the account. Behaviour of the CHANGE PAYMENT transaction follows the RATE CHANGE batch job behaviour. If there is a change in Margin Rate and this option is selected as NO, then system posts only RATE CHANGE transactions on the account. However note that this indicator is applicable to accounts funded with products of type 'Interest Bearing Loans' and Reschedule Method as 'Change Payment’. |
On clicking ‘Post’ system posts RESCHEDULE_INDEX monetary transaction to change the Index and Margin Rates. However, note that the ‘Auto Post Change Payment’ transaction changes the payment amount ‘only if’ the new calculated amount is greater than the old value.
For lease accounts, any rate changes (either variable rate or transaction posting rate) are controlled by the limits (values) defined for ‘Payment Caps’ and ‘Rate Cap & Adjustments’ in Setup > Lease Contract screen.
On successful posting of transaction, the counters in Account Details and Summary screen are updated. Also a letter of intimation is generated for correspondence by the scheduled batch LCSTXN_BJ_121_01 (LETTER FOR LEASE MONETARY TXNS) which consists of rescheduled lease contract terms indicating Transaction Date, old and new Index Rate, Margin Rate and Reason.
You can also reverse the rate change by posting 'Rate Change Reversal' transaction and revert to old rate. If there are any payment(s) received before reversal, the same is adjusted to due buckets based on due amount. However, on reversal letter is not generated and has to be manually intimated.
A.1.8 Payoff Quotes
A payoff quote is the amount still owed on account or amount needed to satisfy the Lease. It can be generated anytime and may be requested during a call from a customer, dealer, or insurance agent. A payoff quote can either be generated for current or future date, but not on a back date.
You can post payoff quote during the life of a Rental/Usage Rental Lease based on following conditions:
- If payoff quote is posted before maturity date, system calculates the early closure charges till the payoff valid up-to date using the available base Rental Charge Matrix.
- If payoff quote is posted after last due date or maturity date, system calculates the un-billed rental charges till the payoff valid up-to date using the available excess Rental Charge Matrix. Similarly, for usage based lease contracts, system calculates un-processed usage history records and displays the amount in Unbilled Usage Charges.
The new balances types are displayed in the transaction result section.
The transaction processing details and new balances after posting payoff quote appears in Results section of Maintenance screen.
![]()
To generate a payoff quote for an account Lease
Transaction |
Parameters |
PAYOFF QUOTE LEASE |
TXN DATE |
PAYOFF QUOTE VALID UPTO DATE |
|
LEASE BUYOUT INDICATOR |
|
DISPOSITION FEE |
|
EARLY TERMINATION FEE |
|
OTHER FEE |
|
DEPRECIATION ADJUSTMENT |
|
CURRENT USAGE |
|
ASSESS PAYOFF QUOTE FEE |
|
PAYOFF QUOTE LTR PRINT |
|
COMMENT |
A.1.9 Account Paidoff
An account is automatically paid off or marked for payoff processing by the system with a batch transaction when the account balance is $0.00. You can also manually payoff an account with the Maintenance screen. You can also pay off an account using the Consumer Lending (Advance and Payment) form. For more information, see the Payment Processing chapter.
When you payoff an account, the system changes the account’s status to PAID OFF. The date the account was paid off appears in Activities section’s Paid Off Dt field on Account Details screen.
The system also notes the amount of the principal that was waived when account was paid off in the Waived column on Account Balances screen.
To pay off an account
Transaction |
Parameters |
Paid off |
Txn Date |
If you reverse the payoff payment using Customer Service form, then the pay-off is automatically reversed. The system changes the account’s status from PAID OFF to ACTIVE when you refresh the account.
A.1.10 Account Charge Off
Charging off an account refers to when a lender decides to take a loss on an account, signalling that attempts to recover the Lease have failed. In calculating a charge off, the system considers the total compensation amount (up front compensation plus remaining compensation amount). It is different from the waive off process since a waive off is a concession offered to the customer on payment of some component, such as a late fee. The repayment of the original Lease still continues in waive off process.
When you charge off account, the system changes the status to CHARGED OFF. The balance on the account appears on Customer Service form’s Balance screen when you choose Deficiency Balance in the Balance Group section.
![]()
The date of the charge off appears on Account Details screen in Activity section’s Chargeoff Dt field.
![]()
However, you can select the ‘Do Not Auto Charge Off’ condition to ignore few account conditions, for the charge-off processing batch job. When an account is marked with the condition DO NOT CHARGE OFF, then batch job will not pick the account for charge off processing.
You can add ‘Do Not Auto Charge Off’ condition in addition to the already existing condition.
You can post CHARGED OFF transaction on the entire hierarchy of Associated/Linked Accounts along with the Master Account i.e. if CHARGED OFF is initiated from an Associated/Linked account, system can post CHARGED OFF on all ACTIVE associated/linked accounts in the hierarchy along with the Master Account.
However, note that you can post CHARGED OFF on Master Account only if Associated Accounts are in TRADED, VOID, TERMINATE, PAID, and CHGOFF status.
To charge off an account
Transaction |
Parameters |
Charged Off |
TXN DATE |
PROCESS MASTER ACCOUNT |
|
PROCESS SAME PRODUCT TYPE AND FUNDING TYPE ACCOUNTS |
|
PROCESS MASTER ASSOCIATED ACCOUNTS |
|
PROCESS ALL ACCOUNTS BASED ON THE SALES ORDER NUMBER |
|
PROCESS LINKED ACCOUNT |
While posting the transaction,
- If PROCESS MASTER ACCOUNT is selected as ‘YES’, then CHARGE OFF transaction is automatically posted to corresponding Master Account. If selected as ‘No’, then CHARGE OFF transaction is posted to current account and its Linked account.
- If Master Account has multiple Linked and Associated Accounts with status TRADED, VOID and Account Close Indicator =N, then system displays an error indicating ‘Invalid status for Associated Accounts’.
- If PROCESS SAME PRODUCT TYPE AND FUNDING TYPE ACCOUNTS is selected as ‘Yes’, then CHARGE OFF transaction is automatically posted to accounts belonging to same product type and selecting ‘No’ posts the transaction to ALL accounts. However, this parameter has no relevance if the 'Process to Master Account' is not set to 'Y'.
- If PROCESS MASTER ASSOCIATED ACCOUNTS is selected as 'Yes', then CHARGE OFF transaction is automatically posted to all Associated Accounts under the Master Account and selecting 'No' posts extension only to current account.
- If PROCESS ALL ACCOUNTS BASED ON THE SALES ORDER NUMBER is selected as ‘YES’, then transaction is automatically posted to all corresponding account(s) which are having the same Sales Order number as that of current account where this transaction is being posted. However before posting, system considers the value defined for other parameters. See section, ‘Processing with Combination of Transaction Parameters’.
- If PROCESS LINKED ACCOUNT is selected as ‘YES’, then CHARGE OFF transaction is automatically posted to current account and its Linked Account(s).
Note that during reversal of a CHARGED OFF transaction on hierarchy of Associated/Linked Accounts, ensure that Master Account is in ACTIVE status. Else, system restricts posting Reversal of a CHARGED OFF transaction for an Associated Account and displays an error indicating ‘CHARGED OFF cannot be reversed - Master Account must be in ACTIVE status’.
A.1.11 Account Closure
The system automatically closes an account when its status changes from ACTIVE status to Paid or Void. It is manually closed if it has status as CHARGE OFF. Accounts marked as Closed are not processed and after a period of time are purged from Oracle Financial Services Lending and Leasing.
![]()
To close an account
Transaction |
Parameters |
Account Close |
Index Txn Date |
A.1.12 Advance (Principal) Balance
The advance (or principal) balance is posted automatically when you fund the contract on Funding screen. You are not allowed to post the advance with Customer Service screen. However, you can waive, charge off or adjust the advance or principal.
The adjustments will appears in the corresponding column of Customer Service screen’s Account Balances sub tab for ADVANCE / PRINCIPAL Balance Type -- Waived, Charged Off, Adjusted (-), or Adjusted (+) -- depending on which of the following transactions you perform.
![]()
To adjust the advance/principal balance
Transaction |
Parameters |
Adjustment To Advance/Principal - Add |
Txn Date Amount |
Adjustment To Advance/Principal - Subtract |
Txn Date Amount |
To charge off the advance/principal balance
Transaction |
Parameters |
Chgoff Advance/Principal |
Txn Date Amount |
To waive the advance/principal balance
Transaction |
Parameters |
Waive Advance/Principal |
Txn Date Amount |
A.1.13 Interest
The interest is accrued or posted automatically when you post the payment on Advance screen’s Advance Entry tab. You cannot post the interest in the Customer Service screen; however, you can adjust or waive interest.
The adjustments will appears in the corresponding column of Customer Service form’s Account Balances screen for INTEREST Balance Type-- Waived, Adjusted (-), or Adjusted (+) -- depending on which of the following transactions you perform.
![]()
To adjust the interest
Transaction |
Parameters |
Adjustment To Interest - Add |
Txn Date Amount |
Adjustment To Interest - Subtract |
Txn Date Amount |
To waive the interest
Transaction |
Parameters |
Waive Interest |
Txn Date Amount |
A.1.14 Interest Accrual
You can start or stop interest accrual on a Lease.
On the Lease Details screens, Stop Accrual box is selected in Interest and Accruals section.
![]()
To remove Stop Accrual indicator, post the start ACCURAL transaction.
To start interest accrual for an account
Transaction |
Parameters |
Start Accrual |
Txn Date |
To stop interest accrual for an account
Transaction |
Parameters |
Stop Accrual |
Txn Date |
A.1.15 Active Military Duty (For Lease)
The Servicemembers Civil Relief Act of 2003 (SCRA), formerly known as the Soldiers and Sailors Civil Relief Act of 1940 (SSCRA), is a federal law that gives military members some important rights as they enter active duty military service. The law also provides protection against certain legal actions during the term of active duty military service. The SCRA function is currently available in the system for Lease.
For lease accounts, on posting the SCRA transaction - BORROWER ON MILITARY DUTY(FOR LEASE), there is no change on the interest rate. On successfully posting the transaction, the following conditions are posted on the account:
- DO NOT CHARGE OFF
- DO NOT TERMINATE
- DO NOT REPOSSESS
To indicate that a borrower is on active military duty
Transaction |
Parameters |
BORROWER ON MILITARY DUTY(FOR LEASE) |
Txn Date |
Borrowers Relation With Account |
|
Active Duty Order Reference |
After you post this transaction, the Military Duty box (Account Details screen Activities section) and Active Military Duty box (Customer Details screen Military Service section) are selected. Oracle Financial Services Lending and Leasing changes the condition of the account to ON ACTIVE MILITARY. Details of the transaction appear in the Military Services section on Customer Details screen.
![]()
OFF-Military Duty (For Lease)
If the borrower is off-military duty, the transaction ‘BORROWER OFF MILITARY DUTY’ is posted to restore the interest and instalment amount for the remaining term.
To indicate that a borrower is no longer on active military duty
Transaction |
Parameters |
BORROWER OFF MILITARY DUTY(FOR LEASE) |
TXN DATE |
BORROWERS RELATION WITH ACCOUNT |
After you post this transaction, the Military Duty check box (in Account Details screen Activities section) and Active Military Duty check box (in Customer Details screen Military Service section) are de-selected. Also the release date (i.e date when released from military duty) is updated in Customer Details screen. Oracle Financial Services Lending and Leasing changes the condition of the account to OFF ACTIVE DUTY.
A.1.16 Due Date Change
You can change the due date of an account. When it is changed, the system determines next bill date, as well as the next due date. The DUE DATE CHANGE transaction does not allow next billing date to change such that it is less than the current billing date. The due date change transaction has been extended to change the default ACH due day, provided that the account due day and ACH due day match.
If a late fee is no longer applicable because of this due day change, Oracle Financial Services Lending and Leasing will automatically remove the fee.
The new due day appears in Activities section Due Day field on the Account Details screen.
![]()
The system also notes change on Lease Details screens in Extn and Due Dates section’s # of Due Day Changes (Year), # of Due Day Changes (Life) and Due Day Chg Dt fields.
To change a due date
Transaction |
Parameters |
Due Date Change |
Txn Date |
Due day |
|
Due Date |
|
ACH DUE DATE CHANGE |
|
PROCESS MASTER ASSOCIATED ACCOUNTS Select either Yes or No from the drop-down list. Selecting ‘Yes’ posts the transaction to Master Account and Associated Accounts and selecting ‘No’ on master account displays an error and rolls-backs all the changes. Note: System does not allow to post the transaction if this parameter is selected as NO and the Statement Consolidation option at account level is set to ‘Y’. |
|
PROCESS SAME PRODUCT TYPE AND FUNDING TYPE ACCOUNTS Select either Yes or No from the drop-down list. Selecting ‘Yes’ posts the transaction on accounts belonging to same product type and selecting ‘No’ posts the transaction to ALL accounts. |
|
CAPITALIZATION START DATE (INCLUDING GRACE DAYS) When extension is being posted on an account for which balance capitalization is enabled, select the next capitalization date from the adjoining calendar which by default includes the CAP GRACE DAYS before triggering the balance capitalization. |
|
PROCESS SAME SALES ORDER NBR ACCOUNTS If selected as ‘YES’, then transaction is automatically posted to all corresponding account(s) which are having the same Sales Order number as that of current account where this transaction is being posted. However before posting, system considers the value defined for other parameters. See section, ‘Processing with Combination of Transaction Parameters’. |
A.1.16.1 Override Due Date Change
You can override the contract ‘Due Date’ of an account to mark-up the due days limit to the required standard business rules by posting the following monetary transaction.
To override a due date change
Transaction |
Parameters |
DUE DATE CHANGE OVERRIDE |
TXN DATE |
DUE DAY |
|
DUE DATE |
|
ACH DUE DATE CHANGE |
|
PROCESS MASTER ASSOCIATED ACCOUNTS Select either Yes or No from the drop-down list. Selecting ‘Yes’ posts the transaction to Master Account and Associated Accounts and selecting ‘No’ on master account displays an error and rolls-backs all the changes. Note: System does not allow to post the transaction if this parameter is selected as NO and the Statement Consolidation option at account level is set to ‘Y’. |
|
PROCESS SAME PRODUCT TYPE AND FUNDING TYPE ACCOUNTS Select either Yes or No from the drop-down list. Selecting ‘Yes’ posts the transaction on accounts belonging to same product type and selecting ‘No’ posts the transaction to ALL accounts. |
|
CAPITALIZATION START DATE (INCLUDING GRACE DAYS) When extension is being posted on an account for which balance capitalization is enabled, select the next capitalization date from the adjoining calendar which by default includes the CAP GRACE DAYS before triggering the balance capitalization. |
|
PROCESS SAME SALES ORDER NBR ACCOUNTS If selected as ‘YES’, then transaction is automatically posted to all corresponding account(s) which are having the same Sales Order number as that of current account where this transaction is being posted. However before posting, system considers the value defined for other parameters. See section, ‘Processing with Combination of Transaction Parameters’. |
On posting the transaction system ignores the following Due Day contract parameters:
- Max Due Day Change/Yr
- Max Due Day Change/Life
- Max Due Day Change Days
- Due Day Min
- Due Day Max
On successful posting of the transaction, system automatically increases the number on counters (i.e. number of times due date change permitted) for ‘Max Due Day Change/Yr’ and ‘Max Due Day Change/Life’. The transaction is displayed in Customer Service > Transaction History > Transactions screen.
![]()
A.1.16.2 Reverse an Override Due Date Change
When a posted ‘Due Date Change Override’ transaction contains error or non desired results, you can reverse the same in Customer Service > Transaction History > Transactions screen.
Select the Due Date Change Override transaction and click Reverse.
![]()
On successful posting of the transaction, system reverts (decreases) the change in the number on counters (i.e. number of times due date change permitted) for ‘Max Due Day Change/Yr’ and ‘Max Due Day Change/Life’.
A.1.17 Payment Refund Transaction
Payment refund transactions allows you to refund excess payment received from the customer during life of the Lease. The Payment Refund transaction is posted at the maintenance screen in servicing. The refund is posted only when the refund amount is equal to Payment amount. Else an error message is displayed.
![]()
To refund the payment amount
Transaction |
Parameters |
PAYMENT REFUND (PMT_RF) |
TXN DATE Select the transaction date from adjoining calendar. |
PAYMENT DATE Select the payment posted date from adjoining calendar. |
|
PAYMENT AMOUNT Specify the payment amount received on the account. |
|
REFUND AMOUNT Specify the payment amount to be refunded. |
|
REASON Select the appropriate reason code from the drop-down list. The list is populated based on the lookup code TXN_REASON_CD (SUB CODE USED FOR REASON GROUP). |
Note that except ‘Reason’ all the other parameters are mandatory for posting payment refund transaction. However, system validates for appropriate reason code when auto-posted from Payment Maintenance screen.
On successfully posting the transaction, the payment refund details are recorded in Customer Service > Transaction History > Transactions tab.
A.1.18 Prepayment Penalty
![]()
A prepayment penalty is typically applied automatically by Oracle Financial Services Lending and Leasing if the account is paid off prematurely.
The following transactions allow you to adjust or waive the prepayment penalty fee. The adjustments will appears in the corresponding column of Customer Service screen’s Account Balances screen for fee prepayment penalty Balance Type-- Waive, Adjusted (-), or Adjusted (+) -- depending on which of the following the transactions you perform.
![]()
To adjust a prepayment penalty
Transaction |
Parameters |
Adjustment Prepayment Penalty - Add |
Txn Date Amount |
Adjustment Prepayment Penalty - Subtract |
Txn Date Amount |
To waive a prepayment penalty
Transaction |
Parameters |
Waive Prepayment Penalty |
Txn Date Amount |
A.1.19 Escrow Payment
The following monetary transactions allow you to specify escrow payment to be billed to the customer each month. Rescheduling an escrow payment enables you to change the payment rate (and hence rate and term) and define when change will begin. The “txn date” parameter is when the new agreement starts.
The following transactions allow you to adjust or waive the escrow advance.
The adjustments will appears in the corresponding column of Customer Service screen’s Account Balances screen for escrow advance Balance Type-- Waive, Adjusted (-), or Adjusted (+) -- depending on which of the following transactions you perform.
To adjust escrow advance
Transaction |
Parameters |
Adjustment to escrow advance - add |
Txn Date Amount |
Adjustment to escrow advance - subtract |
Txn Date Amount |
To waive escrow advance
Transaction |
Parameters |
Waive Escrow Advance |
Txn Date Amount |
To reschedule an escrow payment
Transaction |
Parameters |
Reschedule Escrow Payment |
Txn Date Amount |
A.1.20 Escrow balance refund
If an account is paid off resulting in a positive (greater than $0) escrow balance or the last item being escrowed is removed resulting in a positive (greater than $0) escrow balance, then Oracle Financial Services Lending and Leasing refunds the escrow and creates a check requisition.
A.1.21 Pay Off Quote Fee
The PAYOFF QUOTE transaction on Maintenance screen includes the required parameter ASSESS PAYOFF QUOTE FEE. If you select Y, Oracle Financial Services Lending and Leasing assesses a payoff quote fee on Customer Service form’s Balances screen for Balance Type FEE PAYOFF QUOTE. The amount of the payoff quote fee is based on contract setup.
The following transactions allow you to adjust or waive the pay off quote fee.
The adjustments will appears in the corresponding column of Customer Service form’s Balances screen for FEE PAYOFF QUOTE Balance Type-- Waive, Adjusted (-), or Adjusted (+) -- depending on which of the following transactions you perform.
![]()
To adjust a pay off quote fee
Transaction |
Parameters |
Adjustment to Payoff Quote Fee - Add |
Txn Date Amount |
Adjustment to Payoff Quote Fee - Subtract |
Txn Date Amount |
To waive a pay off quote fee
Transaction |
Parameters |
Waive Payoff Quote Fee |
Txn Date Amount |
A.1.22 Nonperforming Accounts
Lease accounts can be placed in a nonperforming, or nonaccrual, condition. Once an account is set to a nonperforming condition, the system makes the following modifications and accounting entries:
- After the transaction date, Oracle Financial Services Lending and Leasing assesses no late charge to this account.
- Stops general ledger entries for interest accrual.
- Transfers the existing principal balance on this account to the Non-Performing Balance Group on Customer Service form’s Balance screen.
- Charges the unearned dealer compensation back to the dealer.
- Treats payments posted to this account as it does with a normal account; however, the general ledger entries for allocation of these amounts towards principal and interest will go towards the nonperforming balance.
The system’s general ledger (GL) is set up for the above items. There will be no impact on balances of the account (principal, interest, fee and expense) as a result of the above transactions.
To place an account in a nonperforming condition
Transaction |
Parameters |
Account Non Performing |
Txn Date |
Non Performing Description |
The following transaction removes nonperforming condition on an account and reverses the nonperforming transactions explained above. General ledger entries for interest accrual, stopped during nonaccrual stage, resume.
To reverse a nonperforming condition
Transaction |
Parameters |
Resume Account Performing |
Txn Date |
A.1.23 Convert a Precomputed (PC) Lease into a Simple Interest (SI) Lease
When converting a precomputed Lease into a simple interest Lease, Oracle Financial Services Lending and Leasing assumes the following default values:
- Accrual Calculation Method - interest bearing (simple interest)
- Maturity Date - Computed from the term and next payment due date
- Monthly Payment Amount - Computed from the interest rate, new principal balance, accrual start date, and term.
- All balances other than the Note balance are carried over to simple interest Lease.
The resulting ‘new’ simple interest Lease will have the same account number with details entered/computed above.
Caution: The converting a precomputed Lease into a simple interest Lease transaction can be performed only by closing the nonperforming condition.
To reschedule precomputed Lease to interest bearing Lease
Transaction |
Parameters |
Reschedule Pre-Compute Lease to Interest Bearing Lease |
Txn Date |
Reschedule Payment Start Date |
|
Amount |
|
Rate |
|
Term |
A.1.24 Account Settlement Transaction
A delinquent account can be settled when the lender agrees for a specific 'settlement amount' with the borrower. Here the 'settlement amount' is the net amount agreed for settlement between both the parties. If the borrower makes that payment within the 'Good through date', lender would consider that corresponding account is paid off / closed even if actual payment is less than the actual outstanding balance.
Note that, system does not allow to post account settlement transaction on 'Charged Off' accounts. Similarly when ‘Account Settlement Transaction’ is in force, system does not allow to charge-off the account.
To post an account settlement transaction
Transaction |
Parameters |
ACCOUNT SETTLEMENT |
TXN DATE |
EFFECTIVE DATE |
|
GOOD THROUGH DATE |
|
AGREED SETTLEMENT AMOUNT |
|
COMMENT |
Here, the transaction date can be back dated but the effective Date for the settlement need to be the current date or a future date.
On posting the transaction successfully, the new account condition 'Account Under Settlement' is updated with end date as 'Good Through Date'.
- On 'Good Through Date' if the settlement amount is partially or not honoured, system automatically closes the ‘Account Under Settlement’ condition posted on the account and also remove the settlement details posted on the account.
- In case the entire settlement amount is received on or before the 'Good Through Date', on executing the ‘Account Settlement Processing’ batch on that day, system closes the ‘Account Under Settlement’ condition. The 'Settlement Information' in Customer Service Summary screen and Account Details screen is retained to indicate the last settlement information that lead to the PAIDOFF status of the account.
- 'Paid Off' transaction is automatically posted so that account balance will be updated as zero.
- System ignores the Write-off Tolerance amount to post Paid-Off transaction and outstanding balances will be waived.
The 'Settlement Information' is updated in following screens:
- Customer Service > Summary > Account Details > Settlement Information
- Customer Service > Account Details'
If required, this settlement monetary transaction can also be reversed from the 'Payment Maintenance' screen by clicking the 'Reverse' button.
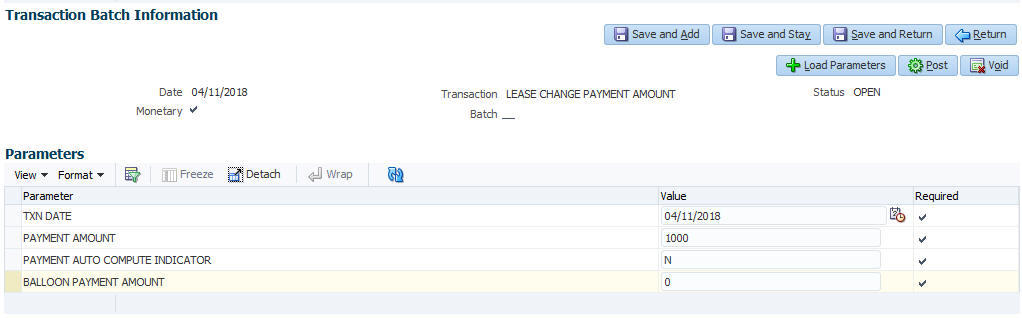
A.1.25 Change Lease Payment Amount
During the servicing stage of lease account, you can change the payment amount by posting ‘LEASE CHANGE PAYMENT AMOUNT’ monetary transaction and generate new repayment schedule. However, note that changing the payment amount is supported only for ‘Interest Rate’ type of lease calculation method.
While posting this transaction, you can either allow system to auto compute the new payment amount or specify the new payment amount for reschedule.
- To auto compute the new payment amount, specify the value of ‘Payment Auto Compute Indicator’ parameter as ‘Y’. System ignores the other parameter values if specified in ‘Balloon Payment Amount’ or ‘Payment Amount’.
- Else, specify the value of ‘Payment Auto Compute Indicator’ parameter as ‘N’ and enter the value for new ‘Payment Amount’. Here system validates the value in ‘Balloon Payment Amount’ and displays an error indicating that ‘Balloon amount should be zero for override payment change’.
To change the payment amount
Transaction |
Parameters |
CHANGE PAYMENT AMOUNT |
TXN DATE |
PAYMENT AMOUNT |
|
PAYMENT AUTO COMPUTE INDICATOR |
|
TERM |
|
BALLOON PAYMENT AMOUNT |
On successful posting of the transaction, a letter of intimation is generated for correspondence by the scheduled batch LCSTXN_BJ_121_01 (LETTER FOR LEASE MONETARY TXNS) which consists of rescheduled lease contract terms indicating Transaction Date, old and new Payment Amount and Balloon Payment Amount.
You can also reverse the payment amount change and revert the payment to old amount. If there are any payment(s) received before reversal, the same is adjusted to due buckets accordingly. However, on reversal letter is not generated and has to be manually intimated.
A.1.26 Lease Extension
During the lease period or after the end of a lease term, you can extend the lease contract by posting ‘LEASE EXTENSION’ transaction. Based on the transaction posting date i.e. either on or before the current maturity date, the lease term is extended immediately and a comment is posted on the account indicating ‘Term extended before/after maturity date’.
Lease extension is allowed within and up to the current available residual % value of the asset and is validated against the following extension limits (values) defined in Setup > Contract screen before allowing for extension.
- Max Extn Period / Life
- Max # Extn /Life
- Minimum # Payments
Note that, lease extension is allowed only for ‘Interest Rate’ type of lease calculation method and for accounts in active status. However, lease extension is not allowed in the following conditions:
- If residual value is already included in final statement
- If extension posting date is before the maturity date
- If 'Estimated Life' of asset is less than extension period
- If the residual value is ZERO
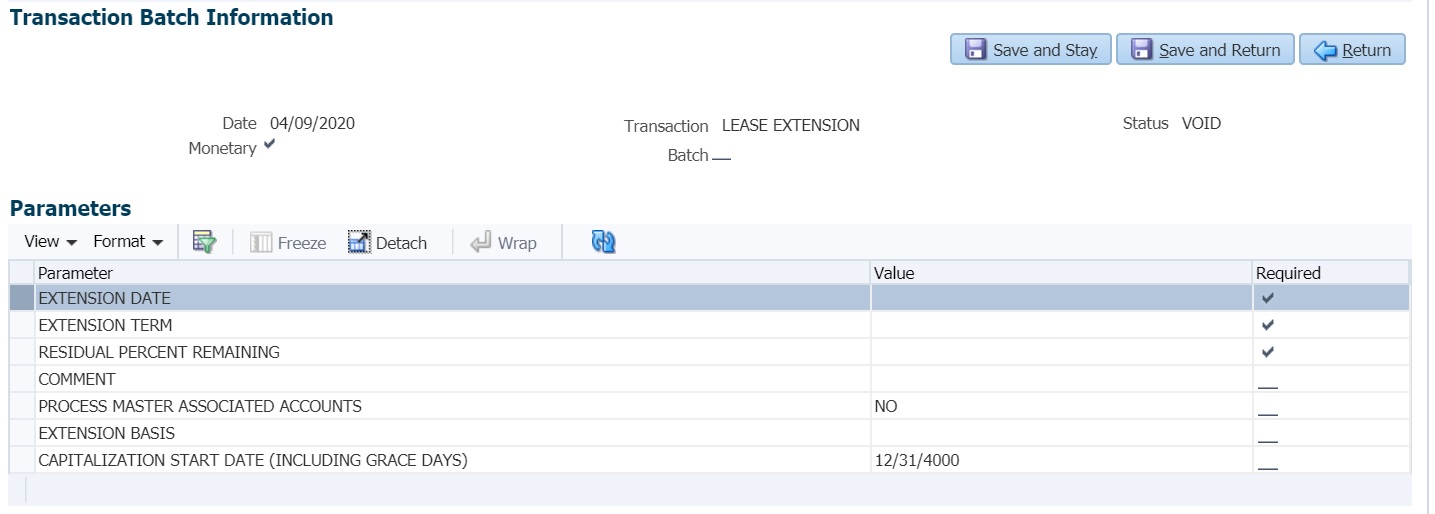
To extend lease contract
Transaction |
Parameters |
LEASE EXTENSION |
EXTENSION DATE |
EXTENSION TERM |
|
RESIDUAL PERCENT REMAINING |
|
COMMENT |
|
PROCESS MASTER ASSOCIATED ACCOUNTS Select either Yes or No from the drop-down list. Selecting ‘Yes’ posts the extension transaction to Master Account and Associated Accounts and selecting ‘No’ posts extension only to current account. |
|
EXTENSION BASIS Select one of the following option as the basis for posting the extension from the drop-down list. OLDEST DUE DATE -To post extension considering the oldest unpaid due date. Any paid due buckets is not altered and original due dates are retained. UNPAID DUES - To post extension considering only the unpaid due buckets. Here the unpaid due dates are moved by adding the terms represented in the transaction. Unpaid dues are those for which Payment = N in Due Date History and may also include the partially paid amount (i.e. paid amount - tolerance amount). |
|
CAPITALIZATION START DATE (INCLUDING GRACE DAYS) When extension is being posted on an account for which balance capitalization is enabled, select the next capitalization date from the adjoining calendar which by default includes the CAP GRACE DAYS before triggering the balance capitalization. |
While posting the above transaction, specify the current transaction posting date in Extension date, duration of extension in Extension Term, the percentage of residual value is being utilized for extension in Residual Percent Remaining and additional information or justification for extension in Comment. System validates and displays an error if the residual percent remaining does not match with system maintained data.
On successful posting of transaction, new maturity date is updated on the account and new repayment schedule is generated. Also the counters in Account Details and Summary screen are updated.
A letter of intimation is generated for correspondence by the scheduled batch LCSTXN_BJ_121_01 (LETTER FOR LEASE MONETARY TXNS) which consists of Extension Date, First Pmt Date, Term, Lease Expiry Date, and Residual %.
You can also reverse the lease extension and system automatically reverses the bills generated after the old maturity date. However, on reversal letter is not generated and has to be manually intimated.
A.1.27 Change Lease Term
During the lease period, you can change the maturity date of a lease account and either increase or decrease the lease term by posting ‘LEASE CHANGE TERM’ transaction in Customer Service > Maintenance > Transaction Batch Information section.
‘LEASE CHANGE TERM’ transaction can either be a future or backdated and depends on the payment amount and residual percentage of remaining amount.
Note
The option to change lease term is allowed only for ‘Interest Rate’ type of lease calculation method and for accounts in active status. However, changing lease term does not impact delinquency status of the account except for back dated transactions.
To change lease term
![]()
Transaction |
Parameters |
LEASE CHANGE TERM |
TXN DATE |
PAYMENT AMOUNT |
|
RESIDUAL PERCENT REMAINING |
While posting the above transaction,
- Specify the current transaction posting date in Txn Date field. You can also post a backdated transaction by specifying a previous date but not beyond first the billing date.
- Specify the payment amount and the percentage of remaining residual amount as indicated below:
- To decrease lease term, the payment amount should be greater than the billing amount and residual % should be greater than the system maintained data.
- To increase lease term, the payment amount should be lesser than the billing amount and residual % should be lesser than the system maintained data.
However, lease term can also be changed by maintaining the residual % as zero.
On successfully posting the transaction, the new lease term is calculated between 'Due Dt Next' and 'New Maturity Dt' and is displayed in the ‘Results’ section. Also the new term and other details are updated on the account and new repayment schedule is generated.
The following screens are updated with lease term change:
- Servicing > Customer Service > Scenario Analysis tab
- Servicing > Customer Service > Transaction History > Transactions tab, ‘Details’ column is updated with new lease term.
- Servicing > Customer Service > Transaction History > Repayment Schedule tab, the repayment schedule details are updated.
- Servicing > Customer Service > Summary screen > Account Details > Dues section, the ‘Remaining Term', 'Paid Term' and 'Amt Paid Excess' fields are updated.
- Servicing > Customer Service > Summary screen > Account Details > Account Information section, the ‘Term' and 'Maturity Dt' fields are updated.
- Servicing > Account Details > Account Information section, the following fields are updated - 'Depreciation Value', 'Residual Value', 'Residual %', 'Rent Charge', 'Billed Term', 'Total Term', 'Paid Term' and 'Maturity Dt'.
You can also reverse this transaction in Transaction History > Transactions tab and system automatically reverses the bills generated (if any) post the lease term change.
A.1.28 Lease Security Deposit Adjustment
As part of the collection activity, the security deposit amount paid upfront during the lease contract can be used to adjust the arrears on the account by posting the ‘Security Deposit Adjustment’ transaction.
To Adjust Lease Security Deposit
Transaction |
Parameters |
SECURITY DEPOSIT ADJUSTMENT |
TXN DATE |
AMOUNT (should be less than or equal to security deposit amount) |
|
COMMENT |
Before posting the transaction, ensure that the security deposit balance is adequate to adjust the arrears. Else, system displays a validation error indicating 'Insufficient Security Deposit' amount to adjust'.
On posting the transaction, system adjusts the balances based on either spread matrix or the spread defined at contract. On successful posting of transaction, the ‘Security Deposit’ amount is adjusted on the account as a payment and ‘Late Fee’ (if any) will be eligible for reversal. The ‘Results’ section displays the status of transaction and indicates previous and current Security Deposit Amount on the account.
A letter of intimation is generated for correspondence by the scheduled batch LCSTXN_BJ_121_01 (LETTER FOR LEASE MONETARY TXNS) which consists of Transaction Date, Security Deposit Amount before and after adjustment, and comments if any.
You can also reverse the security deposit adjustment by posting ‘Security Deposit Adjustment Reverse’ transaction and system automatically reverses the balance of transaction amount to the ‘Security Deposit Amount’. However, on reversal letter is not generated and has to be manually intimated.
A.1.29 Lease Fee Usage Adjustments
After calculating the lease fee usage if there are any differences which needs to be corrected (increase/decreased) to the fee usage amount, you can post the following two types of lease transactions to adjust fee usage balance accordingly.
- Adjustment to Fee Usage - ADD
- Adjustment to Fee Usage - SUBTRACT
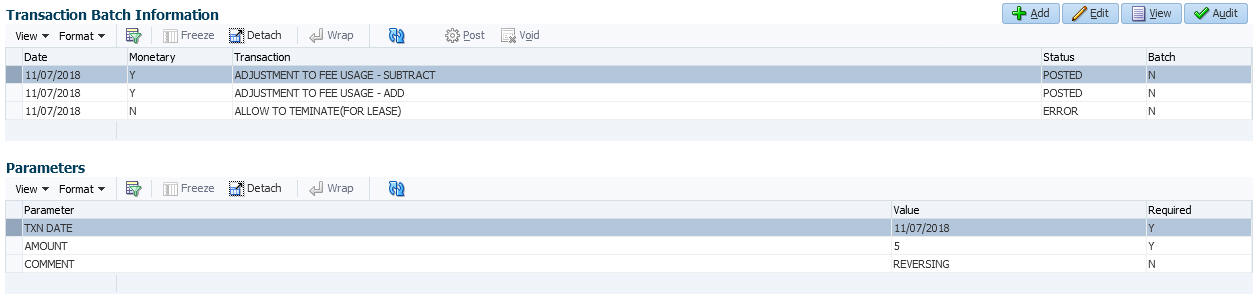
To Add Lease Fee Usage
Transaction |
Parameters |
ADJUSTMENT TO FEE USAGE - ADD |
TXN DATE |
AMOUNT (Fee Usage amount that needs to be added) |
|
COMMENT |
To Subtract Lease Fee Usage
Transaction |
Parameters |
ADJUSTMENT TO FEE USAGE - SUBTRACT |
TXN DATE |
AMOUNT (Fee Usage amount that needs to be subtracted) |
|
COMMENT |
For more information on how OFSLL handles lease calculation and billing, refer to APPENDIX - Usage Based Leasing chapter.
A.1.30 Evergreen Lease Transaction
Evergreen lease in OFSLL refers to a type of lease contract between customer and financial institution in which the customer can use an asset which is still in working condition and agrees to pay a minimum lease amount for a specific term, even if the residual value of asset becomes zero.
This lease amount is a mutually agreed value by both the parties and does not specifically include depreciation cost of asset or the interest component.
For example, if an Evergreen Lease contract is agreed for Lease Payment Amount of $5 and Term of 36 months, the billing is done for lease receivables as follows:
Cycle |
Lease Receivable without Payment |
Lease Receivable with Monthly Payment |
Term |
Remaining Term |
0 |
0 |
0 |
0 |
36 |
1 |
5 |
5 |
1 |
35 |
2 |
10 |
5 |
2 |
34 |
3 |
15 |
5 |
3 |
33 |
N |
N x Lease Payment Amount |
Lease Payment Amount |
4 |
32 |
Similar to any other lease contract, even in Evergreen Lease the customer is billed for the agreed payment amount until the lease maturity date and lease receivable is updated based on the billing. Other transactions such as late fee, lease payoff and termination are processed as usual.
You can define Evergreen Lease contract in OFSLL by posting EVER GREEN LEASE monetary transaction in Servicing > Customer Service > Maintenance screen at anytime i.e. Before / On / After the account maturity date.
Note
Evergreen Lease in OFSLL is supported only for INTEREST RATE type of lease calculation method.
If evergreen lease transaction is posted on existing lease account, the lease account is extended up to the term specified and is billed as per the agreed ‘Payment Amount’ for extended term. Also the ‘Rate’ and ‘Residual %’ of the existing lease are updated to ‘0’ and existing balances are closed by either posting an adjustment minus transaction to the account or collecting the payment from customer.
To post ever green lease transaction
![]()
Transaction |
Parameters |
EVER GREEN LEASE |
EXTENSION DATE |
EXTENSION TERM |
|
PAYMENT AMOUNT |
|
COMMENT |
While posting the above transaction,
- Specify the extension date as either current transaction posting date or a future date. However, system does not allow to post a backdated transaction.
- Specify the extension term which is agreed term between customer and financial institution.
- Specify the payment amount which is rental amount for asset usage.
- Specify additional details (if any) in comment field.
On successfully posting the transaction, the ‘Results’ section displays the details of old and new Maturity Date, Term, Payment Amount and the Residual % is set as zero. The lease receivables are updated with new amount (calculated as New Payment Amount x Term) in Servicing > Balances tab and new repayment schedule is generated. A new Evergreen lease condition is posted on the account.
You can also reverse the Evergreen Lease Transaction in Servicing > Customer Service > Transaction History tab and system automatically reverses the Payment Amount, Term and other existing lease contract details (if any).
System restricts posting the following transactions after posting evergreen lease transaction:
- Lease Change Term transaction - LS_CHANGE_TERM
- Lease Extension transaction - LS_EXTENSION
- Lease Change Payment Amount transaction - LS_CHANGE_PMT_AMT
- Business Credit Limit Maintenance transaction - BUS_CRLMT_MAINT
- Lease SCRA transaction - CUST_ON_MLTRY_DUTY
- Index / Margin Rate Change transaction - RESCHEDULE_INDEX
- Customer Credit Limit Maintenance transaction - CUS_CRLMT_MAINT
- Rate Change transaction - RATE_CHANGE
The following screens are updated on posting Evergreen Lease transaction:
- Servicing > Customer Service tab, the details of 'Days Past Due', 'Pay Off Amt', 'Amount Due', ' Status' and 'Oldest Due Dt' fields are updated and the amount fields are reset to ‘0’.
- Servicing > Summary screen changes:
- Conditions section - Account Condition, Condition Start Dt, and Followup Dt fields are updated.
- Account Details > Dues section - fields are reset to zero, term and other fields are updated accordingly.
- Delinquency Information section - details are cleared since there is no delinquency and balances are written-off.
- Account Information section - the Contract Dt, Adjusted Cap Cost, Term, Rate and Maturity Dt fields are updated.
- Servicing > Account Details > Account Information, the 'Rent Charge' and Additional Details section fields - Total Term, Paid Term and Maturity Dt are updated.
- Servicing > Customer Service > Scenario Analysis tab, Term, Payment Amount and other details are auto populated.
- Servicing > Customer Service > Transaction History tab changes:
- Transactions tab - Description, Amount and Term fields are updated.
- Repayment Schedule tab is updated with new schedule based on term.
- Due Date History tab - existing details (dues) are cleared and new record is created only after first billing.
A.1.31 Lease Rental/Damage Fee Adjustments
After calculating the lease rental fee if there are any rental adjustments or charge which needs to be posted to the account balances (Contract setup > Balances sub tab), you can post the following types of lease monetary transactions.
- ADJUSTMENT TO RENTAL CHARGE - ADD
- ADJUSTMENT TO RENTAL CHARGE - SUBTRACT
- ADJUSTMENT TO DAMAGE CHARGE - ADD
- ADJUSTMENT TO DAMAGE CHARGE - SUBTRACT
To post the above transactions
Transaction |
Parameters |
ADJUSTMENT TO RENTAL/DAMAGE CHARGE - ADD/SUBTRACT |
TXN DATE |
AMOUNT (amount that needs to be updated) |
|
COMMENT |
For more information on how OFSLL handles Rental calculation and billing, refer to ‘Rental Agreement’ section in Origination User Guide.
A.1.32 Trading of Accounts - Monetary Transactions
Following are the monetary transactions involved while processing Trading of Accounts. These processes are either posted automatically by external origination system or need to be posted manually in Servicing > Customer Service > Maintenance screen. For information about how Trading of Accounts is processed in OFSLL, refer to ‘Trading of Accounts’ chapter.
- Trade Enquiry Transaction
- Trade Transaction
- Equity Out Transfer Transaction
- Equity In Transfer Transaction
- Trade Fix Transaction
- Equity in Maintenance Transaction
- Account Charge Off
![]()
A.1.32.1 Trade Enquiry Transaction
Trade Enquiry monetary transaction is posted by external origination system to validate if an Account can be traded. This transaction provides details of total available Equity of an Account for a Specific Validation Date. However, the Trade Amount computation is configurable using User Defined Parameters defined in Setup > Administration > User Defined Parameters screen.
To post Trade Enquiry transaction
Transaction |
Parameters |
TRADE ENQUIRY |
TXN DATE |
TRADE ENQUIRY VALID UPTO DATE |
|
TRADE ENQUIRY LTR PRINT |
|
COMMENT |
While posting the transaction,
- If TRADE ENQUIRY VALID UPTO DATE is specified, then system calculates Accrued Interest on account till the date specified.
- If TRADE ENQUIRY LTR PRINT is selected as ‘YES’, then a Trade Enquiry Letter with specific format is generated. The value of parameters in the letter are fetched from variables defined in the configuration.
On posting this transaction, system displays the response based on configurable calculation parameter definition defined for ‘Trade Equity’ (ACC_EQUITY_AMT) in User Defined Parameters screen. Only those definitions with valid selection criteria are consider for processing.
On processing the transaction, the Result section displays the following information:
- A set of pre-defined details such as:
- ACCOUNT NUMBER
- MASTER ACCOUNT NUMBER (if associated)
- ACCOUNT CURRENCY
- System derived values from User Defined Parameters configuration > Formula Variables.
- System derived interest value if the definition contains Accrued Interest as Formula Variable which is calculated based on TRADE ENQUIRY VALID UPTO DATE as similar to payoff quote.
- System derived final composite Trade Equity value and displays based on the description provided for Target Parameter.
On successful posting the transaction, a comment is posted on the Account indicating ACCOUNT TRADE EQUITY PROVIDED TO FOR AMOUNT USD <AMOUNT> VALID UPTO <DATE>.
A.1.32.2 Trade Transaction
Trade monetary transaction is posted by external origination system to Trade and transfer equity from an existing (old) Account to new Account. This transaction implicitly posts Equity-In transfer and Equity-Out transfer transactions on new and old accounts respectively.
Following are the different types of Trade transactions supported:
Type |
Description |
Upgrade |
In this case, one existing (old) Account is upgraded to new Account. |
Split |
In this case, one existing (old) Account is upgraded to multiple new Accounts. |
Combine |
In this case, multiple old Accounts are upgraded to one new Account. |
![]()
To post Trade transaction
Transaction |
Parameters |
TRADE |
TXN DATE |
PROCESS MASTER ACCOUNT |
|
PROCESS LINKED ACCOUNT |
|
VALIDATE COMMON CUSTOMER |
|
COMMENT |
While posting the transaction,
- If PROCESS MASTER ACCOUNT is selected as ‘YES’, then Trade transaction is automatically posted to corresponding Master Account.
- If PROCESS LINKED ACCOUNT is selected as ‘YES’, then Trade transaction is automatically posted to corresponding Linked Accounts.
- If VALIDATE COMMON CUSTOMER is selected as ‘YES’, then system validates for a common customer between existing (old) and new account. If not, displays an error.
Note the following:
- Before processing actual trade transaction, Trade Equity is computed and updated in ACC_EQUITY_AMT.
- If Trade transaction is posted on Accounts where Trade Equity is zero, then system considers those as ‘Non-Equity Based’ accounts.
- As part of Trade process if Trade Eligible flag is set to ‘N’ for an Asset, then that particular Asset Status is marked as ‘ACTIVE’. Else, asset status is updated to INACTIVE.
Trade transaction will be posted ‘Only if’ the resultant value of following 3 are similar:
- Sum of Equity in itemization of new Accounts
- Sum of Trade Equity of existing (old) Accounts
- Sum of Equity Transfer Amount in Trade Details
In case of mismatch in any one of above, Trade transaction is not posted and instead TRADE MISMATCH transaction is automatically posted by the system with same transaction parameters on the existing (old) account along with a condition - EQUITY MISMATCH DURING TRADE.
In addition,
- During the Trade transaction, a linked ‘Equity Out Transfer Transaction’ is posted on existing (old) Account to transfer Equity to new account.
- Adjustment minus transaction is posted for all open balances on traded (old) Account to mark the outstanding amount as zero.
On successfully posting of Trade transaction,
- A Comment is posted on existing (old) account in the format ACCOUNT TRADED ON <DATE> WITH TOTAL TRADE EQUITY <VALUE> WITH <TRADE FIX REASON> AND <COMMENT>
- Account status is updated as TRADED.
A.1.32.3 Equity Out Transfer Transaction
‘Equity Out Transfer’ monetary transaction is automatically posted by the system to transfer Equity from existing (old) account to new account created as part of trade.
Equity Out transaction parameters
Transaction |
Parameters |
EQUITY OUT TRANSFER |
TXN DATE |
ACCOUNT NBR |
|
AMOUNT |
|
COMMENT |
|
TRADE TYPE |
On successfully posting the transaction, the ‘Equity Out’ field is updated in Account Details > Trade Details screen and a comment is posted on the existing (old) account in the format ACCOUNT EQUITY OUT TRANSFERRED ON <DATE> TO ACCOUNT NUMBER <ACCOUNT NUMBER> WITH VALUE <VALUE>, < TRADE TYPE > AND <COMMENT>.
A.1.32.4 Equity In Transfer Transaction
‘Equity In Transfer’ monetary transaction is automatically posted by the system to update Equity to new account created as part of trade.
Equity In transaction parameters
Transaction |
Parameters |
EQUITY IN TRANSFER |
TXN DATE |
ACCOUNT NBR |
|
AMOUNT |
|
COMMENT |
|
TRADE TYPE |
On successfully posting the transaction, the ‘Equity In’ field is updated in Account Details > Trade Details screen and a comment is posted on the existing (old) account in the format ACCOUNT EQUITY IN RECEIVED ON <DATE> FROM ACCOUNT NUMBER <ACCOUNT NUMBER> WITH VALUE <VALUE>, <TRADE TYPE> AND <COMMENT>.
A.1.32.5 Trade Fix Transaction
You can rectify the equity mismatch for a failed Trade transaction and process the Equity transfer by posting TRADE FIX monetary transaction in Customer Service > Maintenance > Transaction Batch Information section.
To post Trade Fix transaction
Transaction |
Parameters |
TRADE FIX |
TXN DATE |
PROCESS MASTER ACCOUNT |
|
PROCESS LINKED ACCOUNT |
|
VALIDATE COMMON CUSTOMER |
|
TRADE FIX REASON |
|
COMMENT |
This transaction is processed in the same workflow as similar to Trade Transaction. Refer to ‘Trade Transaction’ for details. In addition, you need to select the TRADE FIX REASON from the drop-down list while posting the transaction.
On successfully posting the transaction, a comment is posted on existing (old) account in the format ACCOUNT TRADED ON <DATE> WITH TOTAL TRADE EQUITY <VALUE> WITH <TRADE TYPE>, <TRADE FIX REASON> AND <COMMENT>.
A.1.32.6 Equity in Maintenance Transaction
You can override the ‘Equity In’ adjustments that are received in new account after Trade transaction by posting ‘EQUITY IN MAINTENANCE’ monetary transaction in Customer Service > Maintenance > Transaction Batch Information section.
To post Equity in Maintenance transaction
Transaction |
Parameters |
EQUITY IN MAINTENANCE |
TXN DATE |
AMOUNT |
|
COMMENT |
On successfully posting the transaction, the value specified in ‘Amount’ field is updated to ‘Equity In’ field in Trade Details sub tab of Account Details screen and a comment is posted on existing (old) account in the format ACCOUNT EQUITY IN MAINTAINED ON <DATE> WITH VALUE <VALUE>, <REASON> AND <COMMENT>.
A.1.33 Billing Cycle Change
You can change the billing cycle/statement of a Lease at any point of time during servicing by posting RESCHEDULE BILL CYCLE monetary transaction in Customer Service > Maintenance > Transaction Batch Information section.
Note the following before posting the transaction:
- The ‘Billing Cycle Change’ transaction creates significant impact in the system since it impacts the schedule, dues and sensitive account data on account. Hence it is recommended to be posted with careful consideration and OFSLL is not responsible for any impact/mismatch resulting out of this change.
- The ‘Billing Cycle Change’ transaction can be posted for both Open-Ended and Close-Ended Loans (Vehicle, Home Loan, and Unsecured), Lease and Line of Credit.
- The ‘Billing Cycle Change’ transaction is applicable for all methods like IBL (Interest Bearing Loans) and Amortized Loans.
- The ‘Billing Cycle Change’ transaction is ‘not’ applicable for Pre-compute Loans and for ‘Rent Factor Method’ of lease accounts.
- In case of any error while posting the transaction, system rolls-back all the changes on the account. Refer to OFSLL Release notes available in OTN library (https://docs.oracle.com/cd/F22291_01/references.htm) for additional information on 'Billing Cycle Change' transaction validations.
To post Billing Cycle Change transaction
Transaction |
Parameters |
RESCHEDULE BILL CYCLE |
TXN DATE |
|
PROCESS MASTER ASSOCIATED ACCOUNTS Select either Yes or No from the drop-down list. Selecting ‘Yes’ posts the transaction to Master Account and Associated Accounts. |
|
NEW BILLING Select the billing frequency from drop-down list. |
|
PROCESS SAME PRODUCT TYPE AND FUNDING TYPE ACCOUNTS Select either Yes or No from the drop-down list. Selecting ‘Yes’ posts the transaction on accounts belonging to same product type and selecting ‘No’ posts the transaction to ALL accounts. However, this parameter has no relevance if the 'Process to Master Account' is not set to 'Y'. |
|
PRE BILL DAYS Specify the pre-bill days on account. System displays an error if the PRE BILL DAYS is retained as zero ‘0’ (default value). |
|
DUE DAY MIN Specify the minimum due day to mark-up the due days limit on account to the required standard business rules. System displays an error if the DUE DAY MIN is retained as zero ‘0’ (default value). |
|
DUE DAY MAX Specify the maximum due day to mark-up the due days limit on account to the required standard business rules. System displays an error if the DUE DAY MAX is retained as zero ‘0’ (default value). |
|
MAX DUE DAY CHANGE DAYS Specify the total number of times due date change is permitted) on account. System performs a compatibility check for selected billing cycle. System displays an error if the MAX DUE DAY CHANGE DAYS is retained as zero ‘0’ (default value). |
|
RESCHEDULE PAYMENT START DATE Select the rescheduled/next payment date from the adjoining calendar. Ensure the date selected is not less than 'Last Due Date' (Current Due Date). |
|
PAYMENT AMOUNT If payment amount is specified, then system computes billing change calculation considering system parameter. This is applicable for individual accounts. Retaining as ‘0’ (default) allows system to auto-compute new payment amount during billing change calculation. Required for Master accounts. This field has no relevance for line accounts. |
|
TERM Enter the number of payments. System displays an error if the term is retained as zero ‘0’ (default value). This field has no relevance for line accounts. |
|
RESIDUAL PERCENT REMAINING Specify a value of residual percentage to be accounted in billing. This should not be greater than Account Residual percentage. This is mandatory to be specified if Maturity date is changed for Lease account. |
|
LATE CHARGE GRACE DAYS Specify the number of grace days allowed during billing change calculation. Retaining as ‘0’ (default) does not make any changes on account. |
|
LEASE EARLY TEMINATION Specify the amount to be paid for early termination. Retaining as ‘0’ (default) does not make any changes on account. |
|
COMMENTS |
For detailed information on above fields validation, computation of other transactions, 'Billing Cycle Change' transaction validations, refer to OFSLL Release notes available in OTN library (https://docs.oracle.com/cd/F22291_01/references.htm).
While posting the transaction:
- System allows 'Next Due date' after Current Due Date.
- The ‘Next Billing Date’ is computed after Current Due Date i.e. Next Due Date - Pre Bill Days.
- System allow backdating of this transaction till last due date.
- The ‘Paid Term’ is auto-computed considering the back dated payments (if any).
On successfully posting the transaction, system updates the billing changes to current/master account as defined and internally posts Due Date Change, Change Payment Amount, and Change Term transactions for new billing cycle to be established.
Billing Cycle Change Reversal
Reversal of ‘Reschedule Bill Cycle’ is allowed with following restrictions:
- System changes ‘Account back dated date’ as date of posting of transaction and hence no monetary transaction is allowed to post on or before that date. This implies, system does not allow to reverse the ‘Reschedule billing transaction’ on same date.
- System does not allow to reverse the transaction, if any monetary transaction is posted (except payoff quote), after posting reschedule billing transaction. User is expected to reverse the monetary transaction manually, to reverse the reschedule billing transaction.
A.1.34 Capitalization Maintenance
Capitalization maintenance helps to define the capitalization parameters to capitalize the corresponding account balances to principal balance based on specific frequency. For example, you can capitalize the accumulated Interest or Late Fees to principal balance of the account.
During servicing, you can either enable and define new capitalization parameters for an account or modify / disable the pre-defined capitalization parameters at any point by posting CAPITALIZATION MAINTENANCE monetary transaction in Customer Service > Maintenance > Transaction Batch Information section.
However, note that capitalization is supported only for 'Active' Accounts.
To post Capitalization Maintenance transaction
Transaction |
Parameters |
CAPITALIZATION MAINTENANCE |
TXN DATE |
|
CAPITALIZE Select either YES or NO (default) from drop-down list. |
|
BALANCE Select the type of balance to be capitalized from the drop-down list. Selecting ALL (default) capitalizes all the balances maintained for the account. |
|
FREQUENCY Select the required capitalization frequency from the drop-down list. The list contains the following types of frequency: - Based on specific intervals such as Monthly, Quarterly, Annual and so on. - Based on contract Billing Frequency, Billing Date, or Due date. - Specifically on every Month End. Note: Selecting Balance Frequency option here has no relevance for capitalization. |
|
CAP GRACE DAYS Specify the grace days allowed in the frequency (minimum 0, maximum 31) before capitalizing the balances to account. This is also the deciding factor for executing the capitalization batch job which is based on Capitalization Frequency + Grace Days. However, note that Grace Days are not accounted for Month End type of capitalization frequency and is ignored even if specified. |
|
CAP TOLERANCE AMT Specify the capitalization tolerance amount which is the minimum amount to qualify for capitalization. Any amount less than this is not considered for capitalization of balances. This helps to avoid capitalization of nominal or decimal amounts. Note: There is no specific accounting maintained for non-capitalized decimals with reference to setup. |
|
CAPITALIZE AMT TILL DATE Select either YES or NO (default) from the drop-down list. - Yes - to capitalize the balance amount till date and continue capitalization based on defined parameters. - No - to capitalize the balance amount till date and stop capitalization. NOTE: This parameter is useful only when the capitalization preference is changed from Y to N during servicing, by posting 'Capitalization Maintenance' transaction and if the capitalization was enabled during origination. For other combinations, this parameter is ignored for processing. |
|
CAPITALIZATION START DATE (INCLUDING GRACE DAYS) Select the next capitalization date from the adjoining calendar which by default includes the CAP GRACE DAYS before triggering the balance capitalization. |
On successfully posting the transaction, system deducts the corresponding balance amount and adds to Advance / Principal or Lease receivable balance based on the defined frequency.
Accordingly, as part of capitalization process two transactions are posted on the account and the same can be viewed in Customer Service > Transaction History > Transactions tab. Also, two entries are posted in Customer Service > Balances tab indicating the balance deduction in Capitalized (-) column and principal addition in Capitalized (+) column respectively.
A.1.35 Cycle Based Late Fee Adjustment / Waiver
Late fee is the amount charged when payment is not made within the grace period or by the day after payment is due. The due date is determined by the contract.
Accordingly, the Cycle Based Late Fee Adjustment / Waiver is required to be done when such late fee corrections are to be posted on the account. This can be done during servicing by posting the following types of monetary transactions in Customer Service > Maintenance > Transaction Batch Information section.
![]()
To post Adjustment / Waive Maintenance transaction
Transaction |
Parameters |
ADJUSTMENT TO CYCLE BASED COLLECTION LATE FEE-ADD ADJUSTMENT TO CYCLE BASED COLLECTION LATE FEE-SUBTRACT WAIVE CYCLE BASED COLLECTION LATE FEE ADJUSTMENT TO CYCLE BASED LATE FEE-ADD ADJUSTMENT TO CYCLE BASED LATE FEE-SUBTRACT WAIVE CYCLE BASED LATE FEE |
TXN DATE Select the transaction date from adjoining calendar. |
AMOUNT Specify the amount to be adjusted / waived on the account. |
A.1.36 Fee Consolidation Maintenance
You can update and maintain Fee Consolidation to an Account during Servicing and Collection stage by posting ‘FEE CONSOLIDATION MAINTENANCE’ monetary transaction in Customer Service > Maintenance > Transaction Batch Information section.
![]()
Before posting the transaction, note that:
- The fields are updated only if the value of parameters is greater than zero.
- Transaction is allowed to be posted only those accounts which are linked to Master Account (Including Master Account).
- When Fee Consolidation at Master Account flags are checked, system validates if respective fee balance(s) are available at Master and Associated account or not. Balance validations is enforced only when both Master and Associated accounts have ‘Fee at Master Account flag = Y’.
- If the Account's billing Cycle is Monthly, Weekly, Bi-Weekly, Semi-Monthly, system validates if Late fee Grace Days > 28. Else displays an error.
- If late fee consolidation at Master is Y on Master account, then system validates if Associated Account has same respective fee grace days and fee cycle. Else displays an error.
While posting the fee consolidation on executing the scheduled batch jobs, the processing is done based on following matrix:
Flag |
Master Account (M1) |
Associated Account (A1) |
Action |
Late Charge at Master Account |
Y |
Y |
Loop through Master and Associated Accounts, Post Late Charge at Master Account and a Zero amount Late Charge transaction at Associated Account. |
Y |
N |
Loop through Master and Associated Accounts to find out that there are no Associated Account with fee at master flag = Y. Then consider only the Master Account Due Amount to calculate fee According to Fee calculation Method. |
|
N |
N |
Don’t loop through Master and Associated, Post Late Charge at Master and Associated Based on the Fee Configuration at respective account >Contracts. |
|
N |
Y |
Don’t loop through Master and Associated, Post Late Charge at Master and Associated Based on the Fee Configuration at respective account >Contracts. |
To post Fee Consolidation Maintenance transaction
Transaction |
Parameters |
FEE CONSOLIDATION MAINTENANCE |
TXN DATE Select the transaction date from adjoining calendar. |
|
LATE CHARGE AT MASTER ACCOUNT Select either Yes or No from the drop-down list. Selecting ‘Yes’ allows system to consolidate the late charge assessment at master account level. |
|
LATE CHARGE GRACE DAYS Specify the number of grace days allowed before late charge is assessed on the account. |
|
CYCLE BASED COLLECTION LATE FEE AT MASTER ACCOUNT Select either Yes or No from the drop-down list. Selecting ‘Yes’ allows system to consolidate the cycle based collection late fee assessment at master account level. |
|
CYCLE BASED COLLECTION LATE FEE GRACE DAYS Specify the number of grace days allowed before cycle based fee is assessed on the account. This field is enabled only if the Cycle Based Collection Late Fee option is checked above. |
|
CYCLE BASED LATE FEE AT MASTER ACCOUNT Select either Yes or No from the drop-down list. Selecting ‘Yes’ allows system to consolidate cycle based late fee assessment at master account level. |
|
CYCLE BASED LATE FEE GRACE DAYS Specify the number of grace days allowed before cycle based late fee is assessed on the account. |
|
PROCESS MASTER ASSOCIATED ACCOUNTS Select either Yes or No from the drop-down list. Selecting ‘Yes’ posts the transaction to Master Account and all Associated Accounts. |
|
PROCESS SAME PRODUCT TYPE AND FUNDING TYPE ACCOUNTS Select either Yes or No from the drop-down list. Selecting ‘Yes’ posts the transaction on accounts belonging to same product type and selecting ‘No’ posts the transaction to ALL accounts. |
|
VALIDATE PORTFOLIO COMPANY Select either Yes or No from the drop-down list to indicate the system to validate if the current selected Account and Master Account belongs to the same portfolio company. System does not allow to post the transaction if this option is selected as Yes and the portfolio company is found to be different for both accounts during validation. |
|
REASON Selected the appropriate reason code for posting this transaction from the drop-down list. |
On posting the transaction, system updates the respective indicators under ‘Fee Consolidation’ header in Customer Service > Contract screen.
A.1.37 Accrual and First Payment Date Maintenance
For any specific reason if the interest Accrual Start Date and First Payment Date defined at contract level are not as per the required date, you can adjust the same during the serving stage of an account by posting ACCRUAL AND FIRST PAYMENT DATE CHANGE monetary transaction in Customer Service > Maintenance > Transaction Batch Information section.
However, this transaction is allowed to be posted only on accounts, where there is ‘No Billing, no Transactions’ other than Active Transaction posted on account.
To adjust the Accrual Start Date and First Payment Date transaction
Transaction |
Parameters |
ACR_FIRST_PMT_DT_CHANGE (ACCRUAL AND FIRST PAYMENT DATE CHANGE) |
TXN DATE Select the transaction date from the adjoining calendar. |
ACCRUAL START DATE Select the accrual start date from the adjoining calendar. Ensure that the Start Date is greater than contract date and less than or equal to First Payment date. |
|
NEW FIRST PAYMENT DATE Select the new first payment date from the adjoining calendar. Ensure that the First Payment Date is not less than ‘Accrual Start Date’. |
On successfully posting the transaction, the Results section displays both old and new Accrual Start Date along with old and new First Payment Date.
A.2 Nonmonetary Transactions
This section catalogues the transaction codes and parameters required to complete the following nonmonetary tasks for Lease:
- Update a customer’s /Business name
- Maintain customer details
- Mark a customer/business as a skipped debtor
- Mark a customer as deceased
- Change a customer’s Privacy Opt-Out indicator
- Stop Customer/Business correspondence
- Modify financed insurance information
- ACH Maintenance
- Reprint a statement (batch only)
- Add or stop servicing of accounts with post dated checks as a repayment method
- Stop an ACH for an account
- Add ACH bank
- Cancel or adjust an ESC
- Apply a refund payment to an ESC
- Cancel insurance (or reverse the insurance cancellation)
- Add new escrow insurance details
- Add new escrow tax details
- Change insurance annual disbursement
- Change insurance disbursement plan
- Change escrow indicators of insurance
- Change insurance expiration date
- Change insurance maturity date
- Change tax annual disbursement
- Change tax disbursement plan
- Change escrow indicators of tax
- Resume escrow analysis
- Resume escrow disbursements
- Stop escrow analysis
- Stop escrow disbursements
- Refund or adjust insurance
- Adjust Dealer Compensation
- Add / Modify Account Contact References
- Account Statement Preference Mode
- Cure Letter Date Maintenance
- Change Leased Asset Usage
- Lease Early Termination
- Allow to Terminate Active Military Duty Accounts (For Lease)
- Recourse Details Maintenance
- Customer Credit Limit Transactions
- Add Existing Customer to Account
- Add/Update Business Customer Details
- Rescission Account
- Add Asset to Account
- Customer / Business Credit Score Update
- Master Account Maintenance
- Master Account - Statement Consolidation Indicator Maintenance
- Add Existing Business to Account
- Add Business Phone Details
- Confirm Customer / Business address
- Trading of Accounts - Non-Monetary Transactions
- Bankruptcy Reporting Indicator
- Collateral Maintenance
- Account Contract Maintenance
- Account Payment Mode Maintenance
- Add Balance to Account
- Linked Account Maintenance
- Mock Statement Maintenance
- Skip Credit Bureau Reporting Maintenance
- Repossession Maintenance
- Evergreen Lease Maintenance
- Stop Correspondence at Account Level
- Consolidated Payoff Quote
- Terminate Single/Multi Lease Account(s)
- Add New Customer
- Add/Update customer Address
- Agreement Number Maintenance
A.2.1 Customer/Business Name Maintenance
You can update and change a customer’s or Business name.
To update a customer’s name
Transaction |
Parameters |
Customer Name Maintenance |
Txn Date |
Relation Type Code |
|
Customer First Name |
|
Customer Middle Name |
|
Customer Last Name |
|
Customer Generation |
|
Code |
To update business name
Transaction |
Parameters |
BUSINESS NAME MAINTENANCE |
Txn Date |
BUSINESS NAME |
|
LEGAL NAME |
Here, the legal name is register name of the business and can be the business name itself.
The new details appear throughout the system; for example, in Customer Service screen’s Customer(s) section and Customer Details screen’s Customer section.
![]()
A.2.2 Customer Details Maintenance
You can update and change the following details regarding a customer: social security number, marital status, disability indicator, driving license number, number of dependants, and email address.
To change other details about a customer
Transaction |
Parameters |
Customer Maintenance |
Txn Date |
Relation Type Code |
|
Customer SSN |
|
Customer Marital Status Code |
|
Customer Disability Indicator |
|
Customer Driving License Number |
|
Customer Number of Dependents |
|
Customer Email Address 1 |
|
Customer Birth Date |
|
Customer Gender Code |
|
Customer Language Code |
|
Customer Driving Licence State Code |
|
Customer Time Zone |
|
Payment Hierarchy |
Note
The payment hierarchy is auto-populated by the system based on new/existing customer details and the same can be modified. For more information, refer to Payment Hierarchy field details in Customer sub tab section.
The new details appear throughout the system.
A.2.3 Skipped Customers/Business
When a customer/business cannot be located, the system enables you to mark that customer/business as “skipped” (as in, “the customer/business is a skipped debtor”) Marking a customer/Business as skipped indicates that the customer’s/business whereabouts are unknown.
To mark a customer as “skipped”
Transaction |
Parameters |
Customer Skip |
Txn Date |
Relation Type Code |
|
Customer Skip Indicator |
To mark a business as “skipped”
Transaction |
Parameters |
Business Skip |
Txn Date |
Business Skip Indicator |
The Skip box is selected on the Customer Service screen’s Customer/Business Details tab.
![]()
To remove the Skip indicator, follow the above procedure and update the ‘CUSTOMER/BUSINESS SKIP INDICATOR’ as ‘NO’.
A.2.4 Mark Customer as Deceased
You can mark a particular customer as deceased by posting a non-monetary transaction. Marking a customer as deceased indicates that the 'Account holder is deceased' and this condition is posted on the account and an Alert is populated in Comments tab and Summary tab. Also when a particular customer is marked as deceased, you can change the permission to call the customer as “No” on all accounts and contacts where the customer is attached.
To mark a customer as “deceased”
Transaction |
Parameters |
MARK CUSTOMER AS DECEASED |
DECEASED DATE |
TRANSACTION DATE |
|
|
RELATION TYPE CODE |
|
REMOVE PERMISSION TO CALL |
![]()
You can select the ‘Deceased Date’ and ‘Transaction Date’ (last transaction date) from the adjoining calendar. Select the ‘Relation Type Code’ and ‘Remove Permission To Call’ (as ‘Yes’) from the drop-down list.
System identifies all the related accounts based on Customer ID and marks ‘the customer deceased date’ on all accounts (primary or joint holder) held by the customer. If the transaction is successful, a confirmation message is displayed in the Results section displaying all the customer accounts on which this status is posted. Also a comment is posted on all accounts when the ‘Permission to Call’ status is changed.
The Customer Deceased Date is also indicated on the Customer Details screen’s Military Service section.
![]()
A.2.5 Privacy Opt-Out Indicator
You can change the customer’s/Business Privacy information sharing preference (Opt-Out indicators) along with other choice indicators of Insurance, Share Credit and Marketing preferences by posting the following nonmonetary transaction parameter.
Customer:
Transaction Code: CUS_PRIVACY_INFO
Description: CUSTOMER OPT-OUT PREFERENCES (PRIVACY OPT-OUT)
To change the customer’s privacy opt-out indicators
Transaction |
Parameters |
Customer Privacy Info Sharing Preference |
Transaction Date |
Relation Type Code |
|
Privacy Optout |
|
Insurance Optout |
|
Share Credit Optout |
|
Marketing Optout |
Business:
Transaction Code: BUS_PRIVACY_INFO
Description: BUSINESS OPT-OUT PREFERENCES (PRIVACY OPT-OUT)
To change the business privacy opt-out indicators
Transaction |
Parameters |
BUSINESS OPT-OUT PREFERENCES (PRIVACY OPT-OUT) |
Transaction Date |
Privacy Optout |
|
Insurance Optout |
|
Share Credit Optout |
|
Marketing Optout |
The customer’s Privacy information sharing preferences are updated on the Customer Service screen’s Customer/Business Details tab.
![]()
To remove the customer’s Privacy information sharing preferences, follow above procedure. However, you can also type N in the CUSTOMER STOP CORRESPONDENCE INDICATOR parameter.
A.2.6 Customer/Business Correspondence (stopping)
You can choose at any time to stop correspondence to a customer/business. When you do so, the customer/business will receive no correspondence of any kind from the system.
There is also a provision to stop correspondence at individual account level. For more information, refer ‘Stop Correspondence at Account Level’ section.
To stop correspondence with a customer
Transaction |
Parameters |
Customer Stop Correspondence |
Txn Data |
Relation Type Code |
|
Customer Stop Corr Indicator |
To stop correspondence with a business
Transaction |
Parameters |
Business Stop Correspondence |
Txn Data |
Business Stop Corr Indicator |
The Stop Correspondence box is selected on the Customer Service screen’s Customer/Business Details tab.
![]()
To remove the Stop Correspondence indicator, follow the above procedure and update the ‘CUSTOMER/BUSINESS STOP CORR INDICATOR’ as ‘NO’.
A.2.7 Financed Insurance (modifying)
You can change other insurance details entered on the INSURANCE ADDITION transaction with nonmonetary INSURANCE DETAILS MODIFICATION transaction. The changed insurance information can be viewed on Customer Service screen’s Insurances screen.
Note
In case any issues on existing Lease accounts, you can back port this functionality. Contact your account manager.
Transaction |
Parameters |
Insurance Modification |
Txn Date |
Effective Date |
|
Insurance Type |
|
Policy Effective Date Company Name |
|
Phone # 1 |
|
Extn # 1 |
|
Phone # 2 |
|
Extn # 2 |
|
Policy # |
|
Expiration Date |
|
Primary Beneficiary |
|
Secondary Beneficiary |
|
Refund Amount Received |
|
Full Refund Received |
|
Comment |
A.2.8 ACH Maintenance
The ACH maintenance transaction is for updating the existing ACH Banks details and not to define a new Ach Bank. The transaction is effective provided the ACH account no, ACH routing no, account type are matching with the existing Ach Banks details. On successful posting, the confirmation number will be generated.
To update the existing ACH bank details
Transaction |
Parameters |
ACH Maintenance and NEW ACH MAINTENANCE and ACH ONE TIME PHONE PAY |
ACH Account Number |
ACH Account Type Code |
|
ACH Payment Frequency Code |
|
ACH Status Code |
|
ACH Bank Name |
|
Bank City |
|
Bank State |
|
ACH Bank Routing Number |
|
ACH Reference Number |
|
Payment Mode |
|
Name as it Appears on Account |
|
ACH Default Indicator |
|
ACH End Date |
|
ACH Payment Amount |
|
ACH Payment Amount Excess |
|
ACH Payment Day |
|
Phone Pay Fee |
|
ACH Fee Indicator |
|
ACH Start Date |
|
Debit Date |
|
Txn Date |
Note that for an active Recurring ACH record, ensure that the payment mode is selected as AUTOPAY and for an AUTO PAY type of Payment Mode, ensure that at least one active ACH record exist.
This information appears in the ACH section of the Account Details screen.
![]()
A.2.9 Stop an ACH
To stop an ACH for an account
Transaction |
Parameters |
Stop ACH Maintenance |
Txn Date |
Oracle Financial Services Lending and Leasing clears the information on the ACH section of the Account Details screen.
A.2.10 Statement Reprinting (batch only)
You can reprint a statement of account activity by defining the starting and closing dates included within the statement.
To reprint a statement
Transaction |
Parameters |
Statement Reprint Maintenance |
Txn Date |
Statement Closing Date |
A.2.11 Add ACH Bank
You can add a new ach bank. This enables the customer to make a single payment from more than one bank or monthly payments from different banks. On successful posting, the confirmation number will be generated.
![]()
To add a new ACH bank
Transaction |
Parameters |
ADD ACH BANK |
ACH Account Number |
ACH Account Type Code |
|
ACH Payment Frequency Code |
|
ACH Status Code |
|
ACH Bank Name |
|
ACH Bank Routing Number |
|
ACH Default Indicator |
|
ACH End Date |
|
ACH Payment Amount |
|
ACH Payment Amount Excess |
A.2.12 Post Dated Checks
You can add or stop servicing of accounts with PDC as a repayment method.
The POST DATED CHEQUE MAINTENANCE transaction enables you to switch an account to the post dated check method of repayment.
To add post dated checks as a method of repayment
Transaction |
Parameters |
Post Dated Cheque Maintenance |
Txn Date |
PDC Type |
|
pdc Check Number |
|
pdc Check Date |
|
pdc No Of Checks |
|
pdc Check Amount |
|
pdc Bank Routing Number |
|
pdc Account Type |
|
pdc Account Number |
|
pdc Bank Name |
|
pdc Bank Branch Name |
|
pdc Docket Code |
|
pdc Comments |
|
pdc Frequency |
The STOP POST DATED CHEQUE MAINTENANCE transaction stops processing the payments on an account using Post dated checks. Once this transaction is posted, status of all PDCs attached to a Lease account changes to VOID, indicating that the PDCs are of no use.
To stop post dated checks as a method of repayment
Transaction |
Parameters |
Stop Post Dated Cheque Maintenance |
Txn Date |
A.2.13 Coupon Book Maintenance (batch only)
In reordering coupon books, you will need supply the first date of new coupons, the new coupon start number, and number of new coupons to order.
To re-order coupon book (batch only)
Transaction |
Parameters |
Coupon Book Maintenance |
Txn Date |
Coupon First Payment Date |
|
Coupon Start Number Coupon Count |
To cancel the coupon book re-order before it is processed in the nightly batch, choose Void.
A.2.14 Extended Service Contract (ESC)
You can apply, cancel, or adjust a payment to an extended service contract.
To cancel or adjust an ESC
Transaction |
Parameters |
Warranty Maintenance |
Txn Date |
Insurance/Warranty Cancel Indicator |
|
Insurance/Warranty Cancel Date |
|
Insurance/Warranty Remaining Term |
|
Insurance/Warranty Refund Amount Estimate |
|
Insurance/Warranty Refund Amount Received |
|
Insurance/Warranty |
|
Full Refund Received Indicator |
|
Insurance/Warranty Itemization Code |
To apply a refund payment to an ESC
Transaction |
Parameters |
Warranty Payment Maintenance |
Txn Date |
Insurance/Warranty Refund Amount Received |
|
Insurance/Warranty |
|
Itemization Code |
|
Insurance/Warranty Full Refund Received Indicator |
Note
A Warranty Refund transaction posted or reversed on the Maintenance screen should be matched with a payment posting or reversal.
A.2.15 Insurance Maintenance
To cancel insurance (or reverse the insurance cancellation)
Transaction |
Parameters |
Insurance Maintenance |
Txn Date |
Insurance/Warranty Cancel Indicator |
|
Insurance/Warranty Cancel Date |
|
Insurance/Warranty Remaining Term |
|
Insurance/Warranty Refund Amount Estimate |
|
Insurance/Warranty Refund Amount Received |
|
Insurance/Warranty Full Refund Received Indicator |
|
Insurance/Warranty |
|
Itemization Code |
The above refers to the account insurance and not asset or collateral insurance. For example, ‘Credit Life and Disability’.
A.2.16 Escrow Information and Maintenance
The following nonmonetary transactions allow you to add a new tax or insurance escrow to an account.
To add new escrow insurance details
Transaction |
Parameters |
New Escrow Insurance Details |
Escrow Type |
Escrow Sub Type |
|
Vendor # |
|
Escrow Required (y/n) |
|
Escrow Opt out (y/n) |
|
Annual Disbursement Amount |
|
Disbursement Rule |
|
Transaction Date |
|
Reference Account # |
|
Insurance Policy # |
|
Expiration Date |
|
Maturity Date |
|
Coverage Type |
|
Coverage Term |
|
Coverage Amount |
|
Reason |
|
Reference |
To add new escrow tax details
Transaction |
Parameters |
New Escrow Tax Details |
Escrow Type |
Escrow Sub Type |
|
Vendor # |
|
Escrow Required (y/n) |
|
Escrow Opt out (y/n) |
|
Annual Disbursement Amount |
|
Disbursement Rule |
|
Transaction Date |
|
Reference Account # |
|
Property Tax Type |
|
Reason |
|
Reference |
The following nonmonetary transactions allow you to update any of the escrow information regarding an existing tax and insurance.
To change insurance annual disbursement
Transaction |
Parameters |
Change Insurance Annual Disbursement |
Escrow Type |
Escrow Sub Type |
|
Vendor # |
|
Transaction Date |
|
Annual Disbursement |
|
Amount |
|
Reason |
|
Reference |
To change insurance disbursement plan
Transaction |
Parameters |
Change Insurance Disbursement Plan |
Escrow Type |
Escrow Sub Type |
|
Vendor # |
|
Transaction Date |
|
Disbursement Rule |
|
Reason |
|
Reference |
To change escrow indicators of insurance
Transaction |
Parameters |
Change Escrow Indicators of Insurance |
Escrow Type |
Escrow Sub Type |
|
Vendor # |
|
Transaction Date |
|
Escrow Required (y/n) |
|
Escrow Opt Out (y/n) |
|
Reason |
|
Reference |
To change insurance expiration date
Transaction |
Parameters |
Change Insurance Expiration Date |
Escrow Type |
Escrow Sub Type |
|
Vendor # |
|
Transaction Date |
|
Expiration Date |
|
Reason |
|
Reference |
To change insurance maturity date
Transaction |
Parameters |
Change Insurance Maturity Date |
Escrow Type |
Escrow Sub Type |
|
Vendor # |
|
Maturity Date |
|
Reason |
|
Reference |
To change tax annual disbursement
Transaction |
Parameters |
Change Tax Annual Disbursement |
Escrow Type |
Escrow Sub Type |
|
Vendor # |
|
Transaction Date |
|
Annual Disbursement Amount |
|
Reason |
|
Reference |
To change tax disbursement plan
Transaction |
Parameters |
Change Tax Disbursement Plan |
Escrow Type |
Escrow Sub Type |
|
Vendor # |
|
Transaction Date |
|
Disbursement Rule |
|
Reason |
|
Reference |
To change escrow indicators of tax
Transaction |
Parameters |
Change Escrow Indicators of Tax |
Escrow Type |
Escrow Sub Type |
|
Vendor # |
|
Transaction Date |
|
Escrow Required (y/n) |
|
Escrow Opt Out (y/n) |
|
Reason |
|
Reference |
A.2.17 Escrow Analysis Disbursements
The following nonmonetary transactions allow you to resume and stop escrow analysis and disbursements.
To resume escrow analysis
Transaction |
Parameters |
Resume Escrow Analysis |
Transaction Date |
Reason |
|
Reference |
To resume escrow disbursements
Transaction |
Parameters |
Resume Escrow Disbursements |
Transaction Date |
Reason |
|
Reference |
To stop escrow analysis
Transaction |
Parameters |
Stop Escrow Analysis |
Transaction Date |
Reason |
|
Reference |
To stop escrow disbursements
Transaction |
Parameters |
Stop Escrow Disbursements |
Transaction Date |
Reason |
|
Reference |
A.2.18 Insurance Payment Maintenance
To refund or adjust insurance
Transaction |
Parameters |
Insurance Payment Maintenance |
Txn Date |
Insurance/Warranty Refund Amount Received |
|
Insurance/Warranty |
|
Itemization Code |
|
Insurance/Warranty For Full Refund Received |
Note
The insurance refund posted or reversed on the Maintenance screen should be matched by a payment posting or reversal.
A.2.19 Adjust Dealer Compensation
The following two nonmonetary transactions allows you to adjust dealer compensation (add/subtract) in servicing stage itself for ‘Upfront and Upfront Month end methods’.
Transaction |
Parameters |
ADJUSTMENT TO COMPENSATION AMOUNT - ADD |
COMPENSATION ADJUSTMENT AMOUNT |
COMMENTS |
Transaction |
Parameters |
ADJUSTMENT TO COMPENSATION AMOUNT - SUBTRACT |
COMPENSATION ADJUSTMENT AMOUNT |
COMMENTS |
A.2.20 Add / Modify Account Contact References
The following two nonmonetary transactions allows you to either add or update contact references associated with an account.
- REF_STATUS_NEW - To add contact reference to an account
- REF_STATUS_MAINT - To modify contact reference attached to the account
Parameters to Add contract references:
Transaction |
Parameters |
Add contract references |
TRANSACTION DATE |
|
RELATIONSHIP TYPE CODE |
|
NAME |
|
COUNTRY CODE |
|
ADDRESS 1 |
|
ADDRESS 2 |
|
ZIP CODE |
|
CITY CODE |
|
STATUS CODE |
|
YEARS |
|
MONTHS |
|
PHONE # 1 |
|
EXTENSION PHONE # 1 |
|
PERMISION TO CALL IND #1 |
|
PHONE # 2 |
|
EXTENSION PHONE # 2 |
|
PERMISION TO CALL IND #2 |
|
COMMENT |
Parameters to Modify contract references:
Transaction |
Parameters |
Modify contract references |
TRANSACTION DATE |
|
REFERENCE # |
|
RELATIONSHIP TYPE CODE |
|
NAME |
|
COUNTRY CODE |
|
ADDRESS 1 |
|
ADDRESS 2 |
|
ZIP CODE |
|
CITY CODE |
|
STATUS CODE |
|
YEARS |
|
MONTHS |
|
PHONE # 1 |
|
EXTENSION PHONE # 1 |
|
PERMISION TO CALL IND #1 |
|
PHONE # 2 |
|
EXTENSION PHONE # 2 |
|
PERMISION TO CALL IND #2 |
|
COMMENT |
A.2.21 Account Statement Preference Mode
You can post the following nonmonetary transactions to define the account statement preference mode as either EMAIL or PHYSICAL.
- Transaction Code: ACC_STMT_PREFERENCE_MODE
- Description: STATEMENT PREFERENCE MODE
Transaction
Parameters
ACCOUNT STATEMENT PREFERENCE MODE
TRANSACTION DATE
STATEMENT PREFERENCE MODE
A.2.22 Cure Letter Date Maintenance
You can post the following nonmonetary transactions to update ‘Cure Letter’ details such as Start and Expiry date to the corresponding account. The posted details can be viewed in Customer Service > Account Details > Account Information tab.
- Transaction Code: CURE_LETTER_MAINT
- Description: CURE LETTER DATE MODIFY
Transaction
Parameters
CURE LETTER DATE MODIFY
START DATE
EXPIRY DATE
A.2.23 Recourse Details Maintenance
You can post the following nonmonetary transactions to change existing recourse information such as changing recourse type preference from Partial to Full or vice versa, recourse reason, percentage of recourse allowed or flat amount.
- Transaction Code: RECOURSE_MAINT
- Description: RECOURSE DETAILS MAINTENANCE
Transaction
Parameters
RECOURSE DETAILS MAINTENANCE
TRANSACTION DATE
RECOURSE TYPE
RECOURSE REASON
MAX RECOURSE %
RECOURSE AMOUNT
A.2.24 Change Leased Asset Usage
OFSLL facilitates to change the asset usage details of a lease account to new usage details and charge for the additional usage requested. However, note that this facility is applicable only for vehicle lease.
![]()
Changes to asset usage of collateral for a lease account can be updated into the system by posting the following transaction:
To change asset usage
Transaction |
Parameters |
ASSET CHANGE USAGE/CHARGE DETAILS |
NEW USAGE VALUE |
NEW CHARGE PER UNIT |
|
EXCESS USAGE FEE AMOUNT |
While posting the above transaction, specify the New Usage Value in kilometers and New Charge applicable for every unit extended. In the Excess Usage Fee Amount, you can include one-time fees that can be charged on the account for facilitating change usage. Based on the fee amount specified here, system posts a monetary transaction ‘FUSG_ADJ_PLUS– ADJUSTMENT TO EXCESS USAGE FEE - ADD’ as adjustment to excess usage fee balance. However transaction is not posted if no value is specified.
On successful posting of transaction, the ‘Charge’ and ‘Total’ fields are updated with new details in both Customer Service > Collateral tab and Servicing > Collateral Management screen.
A.2.25 Lease Early Termination
During the lease contract period, you can choose to terminate the lease account before the contract maturity date. OFSLL supports lease termination for both ‘Interest Rate’ and ‘Rent Factor’ type of lease calculated accounts and allows to post the following types of non-monetary transactions:
- Check Early Termination
- Account Early Termination
A.2.25.1 Check Early Termination
Before terminating a lease contract, you can check if the account is eligible for early termination and if eligible, the amount that has to be paid for early termination by posting the ‘Check Early Termination Allowed’ transaction. When early termination is not allowed and termination transaction is posted, system displays an error on validation indicating ‘Minimum criteria for early termination is not met’.
To check for early termination
Transaction |
Parameters |
CHECK EARLY TERMINATION ALLOWED |
TXN DATE (Current or future date) |
On successful posting of the transaction, the ‘Result’ section indicates if early termination is allowed or not.
- If allowed, the amount to be paid for early termination is indicated. For ‘Rent Factor’ method, it is the Lease Receivable Amount and for ‘Interest Rate’ Method, it is the Lease Receivable Amount + Interest/Rent Amount.
- If disallowed, the reason for the same is indicated.
A.2.25.2 Account Early Termination
To terminate a lease contract before maturity, you can post the ‘Account Early Termination’ transaction.
To early terminate lease contract
Transaction |
Parameters |
ACCOUNT EARLY TERMINATION |
TXN DATE (Current or future date) |
TERMINATE ALLOWED IND (Yes or No) |
|
TERMINATE BILLED TERM (Minimum number of bills to be generated) |
|
MIN AMT RECOVERD PER (Percentage of minimum amount to be recovered (Depreciation + Rent Charge i.e. Lease Receivable Amount + Interest) |
When posting the transaction, if ‘Terminate Allowed Indicator’ is changed from No to Yes, ensure that the Billed Term and Minimum Amount Recovered Percentage is greater than zero.
On successful posting of the transaction, the ‘Result’ section indicates the status and other details such as Allowed to Terminate, Billed Term and Lease Amount Recovered.
On posting any of the above transaction successfully, a letter of intimation is generated for correspondence by the scheduled batch LCSTXN_BJ_121_01 (LETTER FOR LEASE NON-MONETARY TXNS) with the updated details.
A.2.26 Allow to Terminate Active Military Duty Accounts (For Lease)
For lease accounts if the borrower is on active military duty and the monetary transaction - ‘Active Military Duty (For Lease)’ is posted, system automatically posts ‘DO NOT TERMINATE’ condition along with the other conditions on the account. When this condition is active, account cannot be terminated since termination transaction is not allowed to be posted.
To override the above ‘DO NOT TERMINATE’ condition (only if posted) and capture customer request to terminate Active Military Duty Accounts, you can post the following non-monetary transaction:
To allow terminating Active Military Duty Accounts
Transaction |
Parameters |
ALLOW TO TERMINATE(FOR LEASE) |
TXN DATE (Current or future date) |
COMMENTS (additional information, if any) |
On successful posting of the transaction, the ‘DO NOT TERMINATE’ condition is closed on account and the condition close date is updated in ‘Condition History’ tab. The ‘Result’ section indicates the transaction processing details.
A.2.27 Customer Credit Limit Transactions
In Oracle Financial Services Lending and Leasing, you can define Customer Credit Limit based on the customer credit worthiness or historical customer data and using this limit, applications can be funded up to the credit limit amount allowed.
The defined credit limit details can further be changed by posting appropriate non-monetary transaction. The ‘Transactions’ sub tab available in Servicing > Customer Credit Limit screen’s > Customer/Business tab allows you to post a set of non-monetary transactions to update specific customer credit limit details on the account. However, the same transactions can also be posted from Customer Service > Maintenance tab.
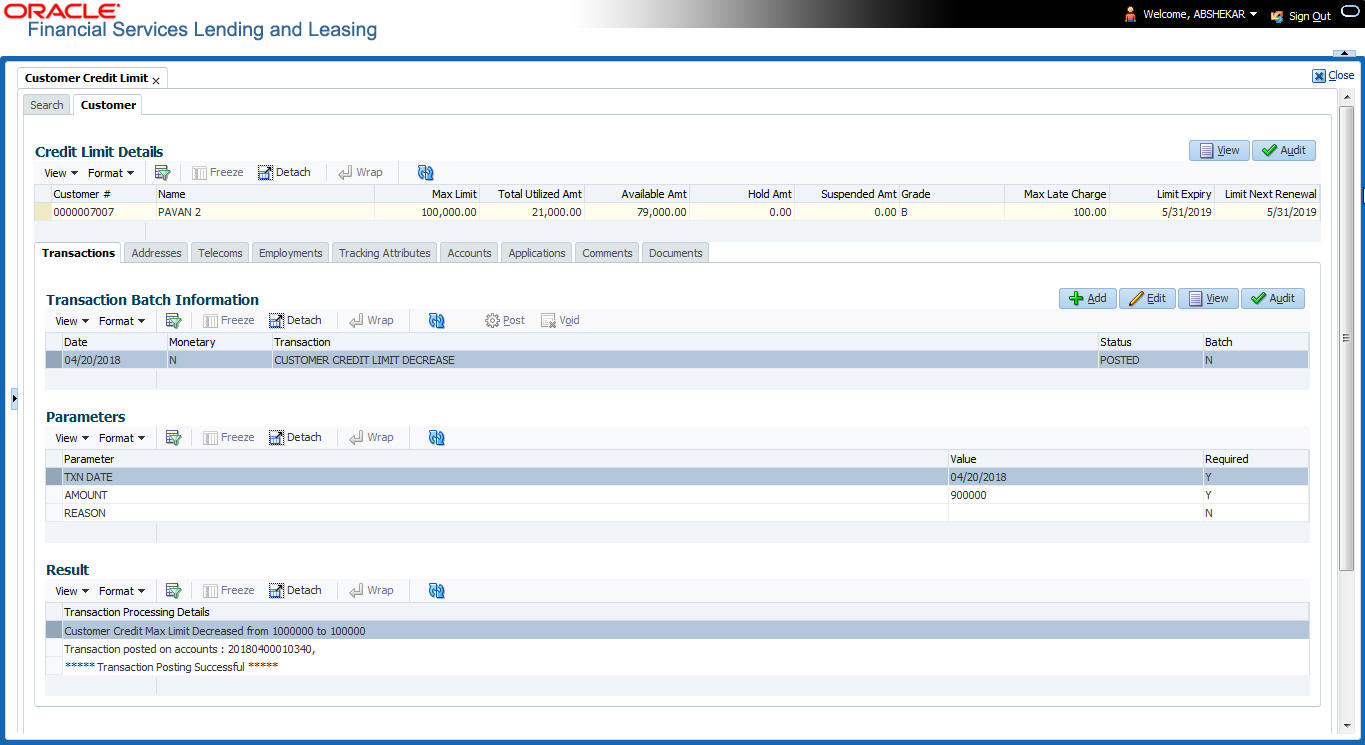
A.2.27.1 Customer Credit Limit Transactions
To update the customer credit limit details, post the following transactions:
Purpose |
Transaction Code |
Transaction Description |
To increase the customer Max limit field by given amount. |
CUS_CRLMT_INCREASE |
CUSTOMER CREDIT LIMIT INCREASE |
To decrease the customer Max limit field by given amount. |
CUS_CRLMT_DECREASE |
CUSTOMER CREDIT LIMIT DECREASE |
To move given transaction amount from Hold amount to Customer Max limit field. |
CUS_CRLMT_HOLD_DECREASE |
DECREASE CUSTOMER CREDIT LIMIT HOLD AMOUNT |
To move given transaction amount from customer Max limit to HOLD amount field. |
CUS_CRLMT_HOLD_INCREASE |
INCREASE CUSTOMER CREDIT LIMIT HOLD AMOUNT |
To move the given transaction amount from Max Limit field to suspended amount field. |
CUS_CRLMT_SUSPEND_INCREASE |
INCREASE CUSTOMER CREDIT LIMIT SUSPEND AMOUNT |
To move the given transaction amount from suspended field to Max Limit amount field |
CUS_CRLMT_SUSPEND_ DECREASE |
DECREASE CUSTOMER CREDIT LIMIT SUSPEND AMOUNT |
For the above transactions, following parameters are to be defined:
- Date: The transaction date
- Amount: Amount to increase / decrease credit limit, Hold and Suspend.
- Reason: Additional information if any.
On successful posting of the transaction, a comment is posted indicating the amount increased / decreased from old value to new value.
A.2.27.2 Business Credit Limit Transactions
To update the business credit limit details, post the following transactions:
Purpose |
Transaction Code |
Transaction Description |
To increase the business Max limit field by given amount. |
BUS_CRLMT_INCREASE |
BUSINESS CREDIT LIMIT INCREASE |
To decrease the business Max limit field by given amount. |
BUS_CRLMT_DECREASE |
BUSINESS CREDIT LIMIT DECREASE |
To move given transaction amount from Hold amount to business Max limit field. |
BUS_CRLMT_HOLD_DECREASE |
DECREASE BUSINESS CREDIT LIMIT HOLD AMOUNT |
To move given transaction amount from business Max limit to HOLD amount field. |
BUS_CRLMT_HOLD_INCREASE |
INCREASE BUSINESS CREDIT LIMIT HOLD AMOUNT |
To move the given transaction amount from Max Limit field to suspended amount field. |
BUS_CRLMT_SUSPEND_INCREASE |
INCREASE BUSINESS CREDIT LIMIT SUSPEND AMOUNT |
To move the given transaction amount from suspended field to Max Limit amount field |
BUS_CRLMT_SUSPEND_DECREASE |
DECREASE BUSINESS CREDIT LIMIT SUSPEND AMOUNT |
For the above transactions, following parameters are to be defined:
- Date: The transaction date
- Amount: Amount to increase / decrease credit limit, Hold and Suspend.
- Reason: Additional information if any.
On successful posting of the transaction, a comment is posted indicating the amount increased / decreased from old value to new value.
A.2.27.3 Customer/Business Credit Limit Maintenance
To adjust the Grade, Late Charge, or Limit Expiry details of a defined credit limit, you can post ‘CUSTOMER/BUSINESS CREDIT LIMIT MAINTENANCE’ transaction:
Transaction |
Parameters |
CUS_CRLMT_MAINT or BUS_CRLMT_MAINT |
TXN DATE |
GRADE |
|
MAX LATE CHARGE RATE |
|
LIMIT EXPIRY DATE |
|
LIMIT NEXT RENEWAL DATE |
On successful posting of the transaction, a comment is posted indicating the amount increased / decreased from old value to new value.
A.2.27.4 Customer/Business Address Maintenance
To add/update Customer/Business address details into the following tabs, you can post ‘ADD CUSTOMER/BUSINESS ADDRESS PHONE’ transaction.
- Servicing > Customer Service > Customer details tab > Customer/Business > Addresses sub tab
- Servicing > Customer Credit Limit > Customer/Business > Addresses sub tab
Also, note that if the address details are added or updated directly from the above tabs, system automatically posts the below transaction.
Transaction |
Parameters |
CUS_ADR_PH_MAINT or BUS_ADR_PH_MAINT |
TXN DATE |
ADR ADDRESS TYPE CODE |
|
ADR PHONE |
|
ADR MAILING INDICATOR |
|
|
ADR POSTAL ADDRESS TYPE CODE |
|
ADR ADDRESS NUMBER |
|
ADR STREET PRE TYPE CODE |
|
ADR STREET NAME |
|
ADR STREET TYPE CODE |
|
ADR STREET POST TYPE CODE |
|
ADR APARTMENT NUMBER |
|
ADR ADDRESS2 |
|
ADR CITY |
|
ADR STATE CODE |
|
ADR ZIP |
|
ADR ZIP EXTENSION |
|
ADR COUNTRY CODE |
|
ADR COMMENT |
|
ADR CENSUS TRACT/BNA CODE |
|
ADR MSA CODE |
|
PERMISSION TO CALL IND |
|
PERMISSION TO TEXT IND |
A.2.27.5 Customer/Business Telecom Maintenance
To add Customer/Business Telecom details into the following tabs, you can post ‘ADD CUSTOMER TELECOM / ADD BUSINESS TELECOM’ transaction.
To update Customer / Business Telecom details into the following tabs, you can post CUSTOMER TELECOM MAINTENANCE / BUSINESS TELECOM MAINTENANCE transactions.
- Servicing > Customer Service > Customer details tab > Customer/Business > Telecoms sub tab
- Servicing > Customer Credit Limit > Customer/Business > Telecoms sub tab
Also, note that if the Telecom details are added or updated directly from the above tabs, system automatically posts the below transaction.
Transaction |
Parameters |
ADD CUSTOMER TELECOM CUS_NEW_TEL or ADD BUSINESS TELECOM BUS_NEW_TEL
CUSTOMER TELECOM MAINTENANCE CUS_TEL_MAINT or BUSINESS TELECOM MAINTENANCE BUS_TEL_MAINT |
TXN DATE |
RELATION TYPE CODE (Applicable for Customer Telecom) |
|
TELECOM TYPE |
|
TELECOM PHONE |
|
CURRENT INDICATOR |
|
TELECOM PHONE EXTENSION |
|
PERMISSION TO CALL IND |
|
PERMISSION TO TEXT IND (Applicable for Business Telecom) |
|
BEST CALL START TIME |
|
BEST CALL START TIME PERIOD |
|
BEST CALL END TIME |
|
BEST CALL END TIME PERIOD |
|
TELECOM TIME ZONE |
|
BEST DAY TO CALL |
On successfully posting the transaction, a confirmation message is displayed in Result section and the phone details are updated to Customer Service > Customer/Business Details screen. This also serves as primary communication for business if the ‘Permission to Call Indicator’ is ‘Yes’.
![]()
A.2.27.6 Business Partners Maintenance
To add/maintain business partner details into the following tabs, you can post ‘ADD BUSINESS PARTNERS’ or ‘BUSINESS PARTNERS MAINTENANCE’ transactions.
- Servicing > Customer Service > Customer details tab > Customer/Business > Partners sub tab
- Servicing > Customer Credit Limit > Customer/Business > Partners sub tab
Also, note that if the business partner details are added or updated directly from the above tabs, system automatically posts the below transaction.
Transaction |
Parameters |
BUS_PAR_ADD or BUS_PAR_MAINT |
Permission to Call |
Permission to Text |
|
Customer # |
|
|
First Name |
|
MI |
|
Last Name |
|
Suffix |
|
SSN |
|
Birth Dt |
|
Birth Place |
A.2.27.7 Business Affiliates Maintenance
To add/maintain business affiliates details into the following tabs, you can post ‘ADD BUSINESS AFFILIATES’ or ‘BUSINESS AFFILIATES MAINTENANCE’ transactions.
- Servicing > Customer Service > Customer details tab > Customer/Business > Affiliates sub tab
- Servicing > Customer Credit Limit > Customer/Business > Affiliates sub tab
Also, note that if the Affiliates details are added or updated directly from the above tabs, system automatically posts the below transaction.
Transaction |
Parameters |
BUS_AFF_ADD or BUS_AFF_MAINT |
Organization Type |
Legal Name |
|
Name of the Business |
|
Tax ID # |
|
Ownership (%) |
A.2.28 Add Existing Customer to Account
You can attach an existing customer details maintained in the system to an account by posting ‘ADD EXISTING CUSTOMER’ non-monetary transaction in Customer Service > Maintenance > Transaction Batch Information section.
While posting the transaction, you can add a customer linked to another account but with different SSN and Relationship type other than the existing relation mapped to the account. However, system does not allow to attach those Customer details which are marked as either ‘Deceased’ or ‘Bankrupt’.
To add existing customer
Transaction |
Parameters |
ADD EXISTING CUSTOMER |
TXN DATE |
CUSTOMER NUMBER |
|
RELATION TYPE CODE |
|
COMMENTS |
The transaction date has to be the current system date and is auto populated by default. Enter the Customer Number and select the Relation Type Code from the drop-down list. You can specify additional information (if any) as a comment and click ‘Post’.
On successfully posting the transaction, a confirmation message is displayed in Result section. Also, if a second customer is added to a single customer account, the ‘joint’ check box is selected indicating it as joint account thereafter.
Note
Customer addition to GRI linked accounts are to be handled manually. Also if there is a ‘Customer Credit Limit’ defined on the account, the credit limit share of newly added customer has to be defined.
A.2.29 Add/Update Business Customer Details
You can add new business details to an account and/or update the existing business details by posting the following non monetary transactions:
- NEW BUSINESS MAINTENANCE
- BUSINESS MAINTENANCE
Adding or Updating Business details is also supported from Customer Details > Business tab. While posting the above non monetary transactions, you can define the parameters either by selecting from the drop-down list/calendar or specifying the details in free text field. For more information, refer Business sub tab section.
New business details can be added even after an account is created and is usually done in case when the existing business is taken over by another business. When you add new business or update existing details and save the record, the same becomes the current/primary business of the customer and the current indicator is set to ‘Y’ by default.
To add new business details
Transaction |
Parameters |
NEW BUSINESS MAINTENANCE |
TXN DATE ORGANIZATION TYPE BUSINESS TYPE BUSINESS CATEGORY BUSINESS NAME LEGAL NAME TAX ID# START DATE CURR NO OF EMPLOYEES NUMBER OF EMPLOYEES CONTACT PERSON BANK NAME BUSINESS BANK ACCOUNT NUMBER AVG CHECKING BALANCE NUMBER OF LOCATIONS MANAGEMENT SINCE PAYMENT HIERARCHY BUSINESS TIME ZONE BUSINESS SKIP INDICATOR BUSINESS STOP CORR INDICATOR BUSINESS ENABLED INDICATOR PRIVACY OPTOUT BUSINESS EMAIL ADDRESS1 |
Note
The above transaction is supported only for Business accounts and if the same is posted on to a non-business account, system displays an error as ‘Cannot link/add business details to Individual Account’.
To update existing business details
Transaction |
Parameters |
BUSINESS MAINTENANCE |
TXN DATE ORGANIZATION TYPE BUSINESS TYPE BUSINESS NAME LEGAL NAME TAX ID# START DATE CURR NO OF EMPLOYEES NUMBER OF EMPLOYEES CONTACT PERSON BANK NAME BUSINESS BANK ACCOUNT NUMBER AVG CHECKING BALANCE NUMBER OF LOCATIONS MANAGEMENT SINCE CATEGORY CODE PAYMENT HIERARCHY BUSINESS TIME ZONE REASON CODE |
On successfully posting the transaction, a confirmation message is displayed in Result section and the details are populated in Customer Details > Business tab.
A.2.30 Rescission Transaction to Void Account
You can void an account immediately after funding or even during the Servicing stage due to unforeseen circumstances by posting ‘ACC_RESCISSION’ - RESCISSION ACCOUNT non-monetary transaction in Customer Service > Maintenance > Transaction Batch Information section.
The statuses for which the transaction is supported depends on the setup configuration which includes the access for REVERSE button in transaction history for ACTIVE transaction.
However, note that:
- You can void accounts in PENDING status created as part of Account On-Boarding. Refer ‘Pending Account Creation’ section for more information.
- You cannot void an account which is already in Void status.
To rescission a customer linked account
Transaction |
Parameters |
ACC_RESCISSION (RESCISSION ACCOUNT) |
TXN DATE Select the transaction date as the current system date from the adjoining calendar. |
|
PROCESS MASTER ACCOUNT If selected as ‘YES’, then rescission transaction is automatically posted to corresponding Master account. If selected as ‘No’, then rescission transaction is automatically posted to current account. |
|
REASON CODE Select the Reason Code as one of the following from the drop-down list: - TRADE - GRADE - STATUTORY RESCISSION - LATE RESCISSION |
|
COMMENTS Provide additional information as comments (if any). |
|
PROCESS LINKED ACCOUNTS If selected as ‘YES’, then rescission transaction is automatically posted to current account and its Linked Account(s). |
|
PROCESS MASTER ASSOCIATED ACCOUNTS If selected as ‘YES’, then rescission transaction is automatically posted to corresponding Master account and its associated account(s). However before posting, system considers the value defined for other parameters. See section, ‘Processing with Combination of Transaction Parameters’. |
|
PROCESS ALL ACCOUNTS BASED ON THE SALES ORDER NUMBER If selected as ‘YES’, then rescission transaction is automatically posted to void all corresponding account(s) which are having the same Sales Order number as that of current account where this transaction is being posted. However before posting, system considers the value defined for other parameters. See section, ‘Processing with Combination of Transaction Parameters’. |
|
PROCESS ALL ACCOUNTS BASED ON THE AGREEMENT NUMBER If selected as ‘YES’, then rescission transaction is automatically posted to void all corresponding account(s) which are having the same Agreement number as that of current account where this transaction is being posted. However, Reversal of the transaction is to be done at each individual account. Before posting, system considers the value defined for other parameters. See section, ‘Processing with Combination of Transaction Parameters’. |
A.2.30.1 Processing with Combination of Transaction Parameters
Refer to the below table to know how system processes the transaction with the combination of above parameters.
PROCESS MASTER ASSOCIATED ACCOUNTS |
Process Same Sales Order Accounts |
Process Same Agreement Number Accounts |
Priority |
N |
N |
Y |
Transaction is posted to accounts which are having same agreement number. If there is no Agreement # found on account where this transaction is posting, system displays an error. |
N |
Y |
N |
Transaction is posted to accounts which are having same Sales Order number. |
Y |
Y |
Y |
Transaction is posted to accounts based on Process Master Associated Accounts parameter ignoring the other two parameters. |
Y |
N |
N |
Transaction is posted to accounts based on Process Master Associated Accounts parameter. |
Y |
Y |
N |
Transaction is posted to accounts based on Process Master Associated Accounts parameter ignoring the Process Same Sales Order Accounts parameter. |
Y |
N |
Y |
Transaction is posted to accounts based on Process Master Associated Accounts parameter ignoring the Process Same Agreement # Accounts parameter. |
N |
Y |
Y |
Transaction is posted to all those accounts having same Sales Order number and same Agreement number. |
Click ‘Post’. On posting the transaction, system posts 'REVERSE ACTIVE' transaction along with following changes:
- Account status is marked as VOID in Transaction History > Transactions tab
- Corresponding Application status is marked as VOID
- All the Good Transactions on to the account are reversed.
A comment is posted on rescission account in the format RESCINDED ON <DATE> FOR THE <REASON> AND <COMMENT>.
Note
If rescission transaction is posted on Traded accounts, system automatically performs certain actions on existing (old) account and new accounts. For more information, refer to ‘Trade Reversal/Rescission and Charge-off of Account’ section in Appendix: Trading of Accounts chapter.
A.2.31 Add Asset to Account
In addition to swap the asset linked to an account, you can add non primary Asset/Collateral to an Account during Servicing and Collection stage by posting ‘ADD NEW ASSET’ non-monetary transaction in Customer Service > Maintenance > Transaction Batch Information section.
Any collateral with status NEW, INACTIVE and RELEASED can be added through this transaction and the status of the Asset is set ACTIVE by default. If there is already an asset associated to an account or if this is the first one, the new asset is added with Primary indicator as ‘N’ which can to be manually changed in Servicing > Customer Service > Collateral > Vehicle tab.
To add asset to account
Transaction |
Parameters |
ADD NEW ASSET |
NEW ASSET NUMBER |
COMMENTS |
While posting the transaction, you need to specify the New Asset Number. enter additional details (if any) as Comments and select the Reason Code from the drop-down list. Click ‘Post’.
On successfully posting the transaction, a confirmation message is displayed and a comment is posted on the account indicating ‘NEW COLLATERAL ADDED - ASSET NBR:XXX, PRIMARY IND: N’. You can view and further updated the asset details in Servicing > Customer Service > Collateral > Vehicle tab.
A.2.32 Customer / Business Credit Score Update
You can regularly update and store the credit score of a Customer and Business accounts maintained in the system by posting CUSTOMER CREDIT SCORE UPDATE and BUSINESS CREDIT SCORE UPDATE non-monetary transactions in Customer Service > Maintenance > Transaction Batch Information section.
Customer/Business Credit Score is a numeric summary of credit history compiled by the three major credit bureaus - Equifax, Trans Union, and Experian. This is obtained during Credit bureau pull and is one of the indicator for a Customer/Business account in the entire credit report.
Note
On posting ‘CUSTOMER CREDIT SCORE UPDATE’ transaction on any customer account, system automatically posts the transaction to all the linked accounts of that customer.
To update customer/business score
Transaction |
Parameters |
CUSTOMER CREDIT SCORE UPDATE CUS_CREDIT_SCORE_MAINT or BUSINESS CREDIT SCORE UPDATE BUS_CREDIT_SCORE_MAINT |
TXN DATE Select the transaction date from adjoining calendar. |
SCORE RECIEVED DATE Select the date when the score was received from credit bureau. |
|
RELATION TYPE CODE (Applicable only for customer score update) Select the account relation type from the drop-down list. The list displays only those relationship types which are attached to account and are enabled (excluding deceased customer relations). |
|
SOURCE CODE Select the credit bureau from where the customer/business credit score is received from the drop-down list. The list is populated based on the values maintained in CRB_SOURCE_CD lookup code. |
|
SCORE Enter the customer/business credit score value. |
|
REFERENCE NUMBER Enter the reference number associated with the credit score. |
|
REASON CODE Select the reason for posting this transaction from the drop-down list. |
|
COMMENTS Additional information if any. |
On successfully posting the transaction, a confirmation message is displayed in Result section and the record is captured in Customer Service > Customer Details > Customer/Business > Customer/Business Score tab.
A.2.33 Master Account Maintenance
While funding an application in Origination, there is option to categorize the current application to be considered as ‘Master Account’ or link the current application to another existing master account in the system after funding. The selected option in Origination > Funding screen are propagated to Servicing. In Servicing, you can further maintain the linking of associated accounts to Master Account with following option:
- Link/attach an account to Master Account
- Moved a linked account from one Master Account to other
- Remove/de-link an account from Master Account
The above actions can be performed by posting ‘MASTER ACCOUNT MAINTENANCE’ (ACC_MASTER_ACCOUNT_MAINT) non-monetary transaction from Customer Service > Maintenance > Transaction Batch Information section.
To post Master Account Maintenance transaction
Transaction |
Parameters |
MASTER ACCOUNT MAINTENANCE ACC_MASTER_ACCOUNT_MAINT |
TXN DATE Select the transaction posting date from the adjoining calendar. |
ACCOUNT NUMBER Enter the account number which is to be Attached / Moved /Remove to/from a Master Account. Ensure that the current customer is linked to that account. System displays an error if there is a mismatch or an invalid account number is entered. |
|
MASTER ACCOUNT NUMBER Enter the Master Account number to which the current account is to be linked. |
|
MASTER ACCOUNT MAINTENANCE ACTION TYPE Select the action type to be performed from the drop-down list. You can select ADD / UPDATE / REMOVE to modify linking of current account to / from selected Master Account. |
|
VALIDATE COMMON CUSTOMER Select either Yes or No from the drop-down list to indicate the system to validate if there are any common customers between the current selected Account and Master Account. System does not allow to post the transaction if this option is selected as Yes and there are no common customer found during validation. |
|
VALIDATE BILLING CYCLE AND DUE DATE Select either Yes or No from the drop-down list to indicate the system to validate if the current selected Account and Master Account have the same Billing Cycle and Due Day. System does not allow to post the transaction if this option is selected as Yes and the Billing Cycle and Due Day is found to be different during validation. |
|
|
VALIDATE PORTFOLIO COMPANY Select either Yes or No from the drop-down list to indicate the system to validate if the current selected Account and Master Account belongs to the same portfolio company. System does not allow to post the transaction if this option is selected as Yes and the portfolio company is found to be different for both accounts during validation. |
PROCESS LINKED ACCOUNTS Select either Yes or No from the drop-down list. If the parameters is set to ‘Y’ while posting the transaction from Master/Linked/Associated Account(s), then based on the Maintenance Action Type parameter selected as Add / Update / Remove, system Adds, Updates, or Removes the Master Account # to Associated Account and its Linked Account respectively. On posting the transaction a comment is posted in Linked Account indicating ‘MASTER ACCOUNT # ADDED/REMOVED or UPDATED FROM {OLD MASTER ACCOUNT #} TO {NEW MASTER ACCOUNT #}’. Note: This parameter has no significance if the other parameter ‘Process Master Associated Accounts’ is set to Y since system already processes all the Associated Accounts of the Master Account (Assuming Linked Account is also one of the associated account of Master). |
|
PROCESS MASTER ASSOCIATED ACCOUNTS Select either Yes or No from the drop-down list. Selecting ‘Yes’ posts the transaction to Master Account and Associated Accounts and selecting ‘No’ posts the transaction to Current Account. |
|
PROCESS SAME PRODUCT TYPE AND FUNDING TYPE ACCOUNTS Select either Yes or No from the drop-down list. Selecting ‘Yes’ posts the transaction to associated accounts where Product Type is equal to Current Account Product Type where this transaction is posted and selecting ‘No’ posts the transaction to all the Accounts under a Master Account. |
|
REASON CODE Selected the appropriate reason code for posting this transaction from the drop-down list. |
|
COMMENTS Additional information (if any). |
On successfully posting the transaction, a comment is posted on all involved accounts i.e. Master Account and Associated Account. For ‘Add’ transaction new Master Account # is updated and for ‘Update’ transaction, the existing Master Account # is replaced with Account # provided in Transaction Parameters.
In case of an error, the transaction is rolled-back from all the accounts.
Note
If the primary customer of Master Account or linked account is deceased, on replacing the next primary account-relation, the accounts under decease customer have to be updated to new customer Master Accounts manually.
A.2.34 Master Account - Statement Consolidation Indicator Maintenance
While funding an application in Origination, there is a ‘Statement Consolidation’ option to indicate if the system needs to generate consolidated billing statement at Master Account level along with details of all the associated accounts with same billing cycle and due day. If selected in Origination > Funding screen, the same option is propagated to Servicing.
The Statement Consolidation indicator can also be changed in Servicing to either Yes or No by posting ‘STATEMENT CONSOLIDATION INDICATOR MAINTENANCE’ (ACC_STMT_CONSOLIDATE_MAINT) non-monetary transaction in Customer Service > Maintenance > Transaction Batch Information section to facilitate consolidated statement generation at Master Account level.
To update Statement Consolidation indicator
Transaction |
Parameters |
STATEMENT CONSOLIDATION INDICATOR MAINTENANCE ACC_STMT_CONSOLIDATE_MAINT |
TXN DATE Select the transaction posting date from the adjoining calendar. |
STATEMENT CONSOLIDATION INDICATOR Select either Yes or No from the drop-down list to update the Statement Consolidation indicator flag in Customer Service > Account Details > Other section. |
|
PROCESS MASTER ASSOCIATED ACCOUNTS Select either Yes or No from the drop-down list. Selecting ‘Yes’ posts the transaction to Master Account and Associated Accounts and selecting ‘No’ posts the transaction to Current Account. |
|
PROCESS SAME PRODUCT TYPE AND FUNDING TYPE ACCOUNTS Select either Yes or No from the drop-down list. Selecting ‘Yes’ posts the transaction to associated accounts where Product Type is equal to Current Account Product Type where this transaction is posted and selecting ‘No’ posts the transaction to all the Accounts under a Master Account. |
|
REASON CODE Selected the appropriate reason code for posting this transaction from the drop-down list. |
|
COMMENTS Additional information (if any). |
On successfully posting the transaction, the Statement Consolidation indicator is updated in Customer Service > Account Details, ‘Others’ section.
A.2.35 Add Existing Business to Account
You can attach an existing business details maintained in the system to an account by posting ‘ADD EXISTING BUSINESS’ non-monetary transaction in Customer Service > Maintenance > Transaction Batch Information section.
While posting the transaction, you need to enter the existing Business number which is previously not mapped to any account in the system. However, system does not allow to attach those business details which are marked as ‘Bankrupt’.
To add existing business
Transaction |
Parameters |
ADD EXISTING BUSINESS |
TXN DATE |
EXISTING BUSINESS NUMBER |
The transaction date has to be the current system date. On successfully posting the transaction, a confirmation message is displayed in Result section.
A.2.36 Add Business Phone Details
You can update phone details an existing business account maintained in the system to an account by posting ‘BUSINESS PHONE MAINTENANCE’ non-monetary transaction in Customer Service > Maintenance > Transaction Batch Information section.
To add business phone details
Transaction |
Parameters |
BUSINESS PHONE MAINTENANCE |
TXN DATE |
ADDRESS PHONE |
|
ADDRESS TYPE |
|
PERMISSION TO CALL IND |
On successfully posting the transaction, a confirmation message is displayed in Result section and the phone details are updated to Customer Service > Business Details screen. This also serves as primary communication for business if the ‘Permission to Call Indicator’ is ‘Yes’.
A.2.37 Customer/Business Address Confirmation
You can confirm a Customer/Business address that is updated in the system as verified by posting CUSTOMER ADDRESS CONFIRMATION / BUSINESS ADDRESS CONFIRMATION non-monetary transaction in Customer Service > Maintenance > Transaction Batch Information section.
To confirm customer / business address
Transaction |
Parameters |
CUSTOMER ADDRESS CONFIRMATION (CUS_CON_ADR_MAINT) or BUSINESS ADDRESS CONFIRMATION (BUS_CON_ADR_MAINT) |
TXN DATE |
RELATION TYPE CODE (Applicable for Customer address) |
|
ADR ADDRESS TYPE CODE or ADDRESS TYPE |
|
CONFIRMED ADDRESS INDICATOR |
On successfully posting the transaction, a confirmation message is displayed in Result section and the ‘Confirmed’ field is checked in Customer Service > Customer/Business Details > Address Information section.
A.2.38 Trading of Accounts - Non-Monetary Transactions
Following are the non-monetary transactions involved while processing Trading of Accounts.
A.2.38.1 Add / Update Trade Details Transaction
If a Trade transaction has failed during Equity Validation, the same can be manually corrected by adding or updating entries into Trade Details Table and adjust the ‘Equity Transfer Amount’ in existing (old) account maintained in the system. This can be done by posting ‘ADD/UPDATE TRADE DETAILS’ non-monetary transaction in Customer Service > Maintenance > Transaction Batch Information section.
To add entries to Trade Details Table
Transaction |
Parameters |
ADD TRADE TRANSACTION DETAILS -or- UPDATE TRADE DETAILS |
TXN DATE |
AMOUNT |
|
ACCOUNT NUMBER |
|
TRADE TYPE |
|
COMMENTS |
While posting the above transaction, ensure that a valid Destination account or Target (new) account number is entered. For more details on Trade Type, refer to ‘Trade Transaction’ section.
On successfully posting the transaction, a confirmation message is displayed in Result section and a comment is posted on the account in the following format - TRADE DETAILS ADDED/UPDATED ON <DATE> WITH TO <ACCOUNT NBR>, TRADE AMOUNT <VALUE>, TRADE TYPE AS <TRADE TYPE> AND <COMMENT>.
A.2.38.2 Trade Reversal
You can reverse the Trade transaction updates on existing (old) account or Source account which contributed to multiple Equity Out (Split) or one-to-one (Upgrade) in OFSLL by posting ‘TRADE REVERSAL’ non-monetary transaction in Customer Service > Maintenance > Transaction Batch Information section.
To reverse a Trade
Transaction |
Parameters |
TRADE REVERSAL |
TXN DATE |
REASON CODE |
|
COMMENTS |
While posting the above transaction, select the Reason Code as STATUTORY RESCISSION or LATE RESCISSION from the drop-down list.
On successfully posting the transaction, a set of changes are done to traded accounts. Refer to ‘Trade Reversal/Rescission and Charge-off of Account’ section in Appendix - Trading of Accounts chapter.
A.2.39 Bankruptcy Reporting Indicator
You can categorize a particular customer or a business account as bankrupt in OFSLL by posting ‘CUSTOMER / BUSINESS BANKRUPTCY REPORTING INDICATOR’ non-monetary transaction in Customer Service > Maintenance > Transaction Batch Information section.
Marking a customer/business as ‘Bankrupt’ indicates that the particular customer/business cannot repay the debts and this condition is posted on the account and an Alert is populated in Summary tab.
Before posting the transaction, system validates if the existing customer’s/business bankruptcy indicator is set as ‘Y’. If yes, an error is displayed and transaction is not allow to post.
![]()
To mark a Customer Account as Bankrupt
Transaction |
Parameters |
CUSTOMER BANKRUPTCY REPORTING INDICATOR |
BANKRUPTCY INDICATOR |
RELATION TYPE CODE |
|
BANKRUPTCY DISPOSITION |
|
BANKRUPTCY TYPE |
|
EFFECTIVE DATE |
To mark a Business Only Account or SME Account as Bankrupt
Transaction |
Parameters |
BUSINESS BANKRUPTCY REPORTING INDICATOR |
BUSINESS BANKRUPTCY INDICATOR |
BUSINESS BANKRUPTCY DISPOSITION |
|
BUSINESS BANKRUPTCY TYPE |
|
BUSINESS EFFECTIVE DATE |
On successfully posting the transaction, system identifies all the related accounts based on Customer ID/Business and marks ‘Bankruptcy Indicator’ as ‘Y’ on all accounts (primary or joint holder) held by the customer. A confirmation message is displayed in the Results section.
A.2.40 Collateral Maintenance
You can update and maintain asset/collateral details associated to an Account during Servicing and Collection stage by posting ‘ASSET MAINTENANCE’ non-monetary transaction in Customer Service > Maintenance > Transaction Batch Information section.
On posting the transaction, the asset details are updated in Customer Service > Collateral > Home/Vehicle/Others tab and Servicing > Collateral Management > Collateral Details screen.
To post Asset Maintenance to an account
Transaction |
Parameters |
ASSET MAINTENANCE |
TXN DATE |
|
ASSET NUMBER |
|
ASSET CLASS |
|
ASSET TYPE |
|
ASSET SUB TYPE |
|
REGISTRATION NUMBER |
|
MAKE |
|
MODEL |
|
ESTIMATED LIFE |
|
COUNTRY CODE |
|
ZIP |
|
STATE CODE |
|
ADDRESS NUMBER |
|
ADDRESS1 |
|
ADDRESS2 |
|
REASON CODE |
|
COMMENTS |
|
ASSET EXCHANGE INDICATOR |
|
ASSET SHIPMENT DATE |
|
ASSET BLOCK INDICATOR |
|
ASSET IDENTIFICATION NUMBER |
While posting the transaction, ensure the following:
- The Txn Date and Asset Number are mandatory and need to be specified.
- The transaction date should be current system date by default since system does not allow to post back dated or future dated transaction.
- Specify the registered Asset number. Else, system displays an error indicating ‘Asset #: <Asset nbr> does not exist for this account’.
- Specify the Asset Class as per HOME/VEHICLE/OTHER_ASSET_CLASS_CD lookup type.
- The Asset Type and Asset Sub Type should match the Collateral Type of Asset # as defined in Setup > Asset Types > Asset Sub Type screen.
- The Registration number provided for Asset # should be of Collateral Type as ‘HOME’.
- The Zip code entered is validated based on Country code defined in Setup > Zip Codes screen.
- In ASSET EXCHANGE INDICATOR, select Yes or No from drop-down list to indicate if the asset is created as exchange to an old asset. This is applicable only for Vehicle and Home collateral.
- In ASSET SHIPMENT DATE, select the date from adjoining calendar.
- In ASSET BLOCK INDICATOR, select Yes or No from drop-down list to indicate if this asset is blocked to a particular account. This is applicable only for Vehicle and Home collateral.
- In ASSET IDENTIFICATION NUMBER, specify the asset identification number.
On successfully posting the transaction, a confirmation message is displayed in the Results section and collateral details are updated to the account.
A.2.41 Account Contract Maintenance
You can update and maintain Contract Information at Account level during Servicing and Collection stage by posting ‘ACCOUNT CONTRACT MAINTENANCE’ non-monetary transaction in Customer Service > Maintenance > Transaction Batch Information section.
By default, the contract information in Customer Service screen’s Contract sub tab is populated from Origination screen on funding the application and is a display only version of the same information found on the Funding screen’s Contract screen.
This transaction can be posted on all Product Type, Status and Conditions. On posting, the same does not restructure the account based on the account fields update. Also, no calculations are performed as a result of posting of this transaction.
To post Contract updates to an account
Transaction |
Parameters |
ACCOUNT CONTRACT MAINTENANCE |
TXN DATE |
AMOUNT FINANCED |
|
APPLICATION CHANNEL |
|
DISBURSED LOAN AMOUNT |
|
TOTAL DOWN PAYMENT AMOUNT |
|
TOTAL SALES PRICE |
|
CONTRACT RCVD DATE |
|
CONTRACT VERIFIED BY |
|
CONTRACT VERIFIED DATE |
|
COMMENTS |
|
REASON CODE |
For more information on above fields, refer the section Contracts tab in Funding chapter of the Origination User Guide.
On successfully posting the transaction, a confirmation message is displayed in the Results section and contract details are updated to the account in Customer Service > Account Details > Account Details tab.
A.2.42 Account Payment Mode Maintenance
You can update the type of repayment mode to indicate if it is ‘Autopay/Direct Debit or not’ by posting ‘ACCOUNT PAYMENT MODE MAINTAINANCE’ non-monetary transaction in Customer Service > Maintenance > Transaction Batch Information section.
To post repayment mode on an account
Transaction |
Parameters |
ACCOUNT PAYMENT MODE MAINTAINANCE |
TXN DATE |
PAYMENT MODE |
While posting the transaction, select the PAYMENT MODE as one of the following:
- INSTITUTION DRAFT / CHECK
- AUTOPAY (ACH)
- AUTOPAY (CREDIT CARD)
- AUTOPAY (DEBIT CARD)
- POST DATED CHECKS
Note the following:
- For an active Recurring ACH record, ensure that the payment mode is selected as AUTOPAY.
- For an AUTO PAY type of Payment Mode, ensure that at least one active ACH record exist and for CHECK type of Payment Mode, there are NO active ACH records.
On successfully posting the transaction, a confirmation message is displayed in the Results section and Payment Mode option is updated to account in Customer Service > Account Details > Contract Information tab.
A.2.43 Add Balance to Account
While posting specific type of transaction on account to update the balances and if the respective balance is not available at account, system displays an error. In such cases, you can add the specific type of balance to the account at runtime by posting ‘ADD BALANCE TO AN ACCOUNT’ non-monetary transaction in Customer Service > Maintenance > Transaction Batch Information section.
![]()
To add balance to an account
Transaction |
Parameters |
ADD BALANCE TO AN ACCOUNT |
TXN DATE |
BALANCE TYPE |
|
CHARGE OFF METHOD |
|
WRITE OFF METHOD |
|
RESCHEDULE METHOD |
|
BILLED |
|
ACCRUED |
|
NON PERFORMING ROLLOVER |
|
NON PERFORMING BALANCE TYPE |
|
SORT |
All the parameters indicated above are mandatory and can be selected from the drop-down list. While posting the transaction, system validates the following and in case of mismatch, does not allow to post the transaction:
- If the Balance Type is already loaded, system displays and error indicating ‘Balance already available’.
- If the Balance Type does not match with the defined list of codes in TXN_TYPE_CD lookup, system displays an error indicating ‘Balance Type Doesn't Exist’.
- If the Balance Type matches with lookup code but the Product Type is not configured for the balance type in Transaction Codes setup, system displays an error indicating ‘Balance Type not mapped to Product type’.
On successfully posting the transaction, a confirmation message is displayed in the Results section and Balance is updated to account in Customer Service > Transaction History > Balances tab.
A.2.44 Linked Account Maintenance
You can link another account to the current account during servicing and have one-to-one mapping between both by posting ‘LINKED ACCOUNT MAINTENANCE’ non-monetary transaction in Customer Service > Maintenance > Transaction Batch Information section.
This transaction helps to link accounts which are funded separately and also to maintain (add/update/remove) details of the current account.
To post linked account maintenance
Transaction |
Parameters |
LINKED ACCOUNT MAINTENANCE |
TXN DATE Select the transaction posting date from the adjoining calendar. |
LINKED ACCOUNT NUMBER Enter the account number which is to be Attached / Moved /Remove to/from the Current Account. Ensure that the current customer is linked to that account. System displays an error if there is a mismatch or an invalid account number is entered. |
|
LINKED ACCOUNT MAINTENANCE ACTION TYPE Select the action type to be performed from the drop-down list. You can select ADD / UPDATE / REMOVE to modify linking of current account to / from selected Linked Account. |
|
VALIDATE COMMON CUSTOMER Select either Yes or No from the drop-down list to indicate the system to validate if there are any common customers between the current selected Account and Linked Account. System does not allow to post the transaction if this option is selected as Yes and there are no common customer found during validation. |
|
VALIDATE BILLING CYCLE AND DUE DATE Select either Yes or No from the drop-down list to indicate the system to validate if the current selected Account and Linked Account have the same Billing Cycle and Due Day. System does not allow to post the transaction if this option is selected as Yes and the Billing Cycle and Due Day is found to be different during validation. |
|
VALIDATE PORTFOLIO COMPANY Select either Yes or No from the drop-down list to indicate the system to validate if the current selected Account and Linked Account belongs to the same portfolio company. System does not allow to post the transaction if this option is selected as Yes and the portfolio company is found to be different for both accounts during validation. |
|
REASON CODE Selected the appropriate reason code for posting this transaction from the drop-down list. |
|
COMMENTS Additional information (if any). |
On successfully posting the transaction, both the accounts are interlinked and system updates the ‘Linked Account’ field with Account # provided in transaction parameter.
Also a comment is posted on all involved accounts i.e. Master Account and Associated Account. For ‘Add’ transaction new Master Account # is updated and for ‘Update’ transaction, the existing Master Account # is replaced with Account # provided in Transaction Parameters.
A.2.45 Mock Statement Maintenance
Generating a Mock Statement helps to mock the asset billing process with a future date and to get an upfront statement indicating future dues of Master and Associated Accounts. In ‘Vacation Ownership’ industry, such statements are required to forecast future dues based on current ‘Timeshare’ holdings.
In Servicing, the Mock Statement preferences displayed in Customer Service > Account Details tab and Contract Information tab are propagated from Origination > Contract screen and are displayed in ‘View’ mode.
You can update the Mock Statement generation preferences at Master Account level by posting ‘MOCK STATEMENT MAINTENANCE TRANSACTION FOR MASTER ACCOUNT’ non-monetary transaction in Customer Service > Maintenance > Transaction Batch Information section.
This transaction can be posted only from Master Account. In case this transaction is used to deselect the option ‘Mock Statement Req’ to ‘No’, system refreshes the other fields making them ‘Null’ and ‘Read-Only’.
To Post Mock Statement Maintenance to Master Account
Transaction |
Parameters |
MOCK STATEMENT MAINTENANCE TRANSACTION FOR MASTER ACCOUNT |
TXN DATE Select the transaction posting date from adjoining calendar. |
MOCK STATEMENT REQUIRED IND Select this check box to indicate if the account is to be included in Mock statement Generation. |
|
MOCK STATEMENT DATE Select the start month of Mock Statements period using the adjoining calendar. |
|
MOCK CYCLES Select the total number of billings (between 1-12) that are to be generated post Mock Statement Start Date. |
|
MOCK PRE BILL DAYS Specify the number of Pre bill days for Mock Statements generation. |
While generating Mock Statement, system considers the ‘Mock Statement Date’ and ‘Pre Bill Days’ to generate the next Mock Statement Run Date. In case the Mock Statement Next Run Date is less than Contract Date or GL Date which does not match the criteria, system moves the Mock Start Date to same month of next year.
For example,
If Contract date = 6/1/2018
First Payment Date = 7/1/2018
Mock Start Month = July
Mock Start Date = 7/1/2018 (Derived based on Start Month)
Mock Pre Statement days = 60
Mock Statement Run Date Next = 7/1/2018 - 60 days = 5/2/2018 which is Less than Contract Date.
Here the ‘Mock Statement Start Date’ is moved to 7/1/2019 so that Mock Statement Run Date Next = 7/1/2019 - 60 days = 5/2/2019
On successfully posting the transaction, a confirmation message is displayed in the Results section indicating the ‘Transaction Processing Details’ and when the transaction Posting occurs.
The batch job TXNMDT_BJ_100_01 (MOCK BILLING/DUE DATES PROCESSING) available in SET-TPE batch job set generates the future dues/balances based on the parameters defined in the criteria. This batch job is a prerequisite run for the mock statements to get generated.
The batch job OMSPRC_BJ_100_01 (MASTER ACCOUNT CUSTOMER MOCK STATEMENT GENERATION) available in SET-ODD2 batch job set generates Mock Statements based on Mock Statement Details.
While processing, the batch job picks only those accounts with ‘Mock Statement Req = Y’ and ‘Master Account Flag = Y’. This batch job is run on ‘Mock Statement Run Date Next’ and generates the number of dues based on ‘Mock Statement Cycles’.
The structure of the Mock Statement generated is controlled based on Record and Column definitions maintained in the data file MASTER_ACCOUNT_MOCK_STATEMENT (MASTER ACCOUNT CUSTOMER MOCK STATEMENT) defined in Setup > Administration > System > Data Files screen’s Output tab.
A.2.46 Skip Credit Bureau Reporting Maintenance
The Skip Credit Bureau Reporting Maintenance allows you to selectively exclude or include a particular account from being reported to credit bureau. This is required in Timeshare Business where there is no need to report the due/Maintenance accounts to credit Bureau.
As per the Product setup, if an account is funded with option Yes / No to ‘Skip Credit Bureau’ reporting in Metro-II batch job process, the same can be changed during servicing stage by posting ‘SKIP CREDIT BUREAU REPORTING MAINTENANCE’ non-monetary transaction in Customer Service > Maintenance > Transaction Batch Information section.
However, Skip Credit Bureau Reporting also depends on Stop Bureau condition posted on the account.
To update skip credit bureau reporting option on an account
Transaction |
Parameters |
SKIP CREDIT BUREAU REPORTING MAINTENANCE |
SKIP CREDIT BUREAU REPORTING |
Select YES or NO from the drop-down list.
On successfully posting the transaction, a confirmation message is displayed in the Results section and ‘Skip Credit Bureau Reporting’ option is updated in Customer Service > Account Details > Account Information section.
A.2.47 Repossession Maintenance
When SCRA borrower is on military duty, asset repossession cannot be done on the account. However, in case the SCRA borrower voluntarily offers financial institution to repossess the asset, the same can be updated in the system by posting ‘REPOSSESSION MAINTENANCE’ non-monetary transaction in Customer Service > Maintenance > Transaction Batch Information section.
The REPOSSESSION MAINTENANCE allows to modify the option ‘Allow Repossession on SCRA’ to Y or N in Customer Service > Account Details tab > Others section. By default, this check box is not selected indicating that system does not allow REPOSSESSION for SCRA enabled accounts. If the options is set Y, system allows to post REPOSSESSION condition on SCRA Accounts using Call Activity or any other ways available.
Note that REPOSSESSION MAINTENANCE transaction can be posted only if customer is on military duty where SCRA indicator = Y. Else, system displays an error message indicating ‘Transaction not allowed, if customer is not in military duty’. In case of joint applicants, atleast one of the customer attached to account is to be on SCRA duty and SCRA flag = Y to post the transaction.
To post voluntary repossession maintenance
Transaction |
Parameters |
REPOSSESSION MAINTENANCE |
TXN DATE |
Select the transaction posting date from adjoining calendar.
On successfully posting the transaction, a confirmation message is displayed in the Results section indicating the date on which the transaction is posted. Also the ‘Allow Repossession on SCRA’ check box is updated in Customer Service > Account Details tab > Others section.
A.2.48 Evergreen Lease Maintenance
When a lease account is eligible to be renewed to ever green lease, system can automatically put the account to Evergreen mode on maturity date + grace days on running the schedule batch job TXNEGC_BJ_121_01 (POST MATURITY EVER GREEN TRANSACTION PROCESSING). However for this to happen, you need to define a set of parameters which helps system to decide on the account eligibility before posting the transaction.
The Evergreen Lease Maintenance transaction helps to maintain evergreen lease parameters at individual account level. You can either define new parameters or update the pre-defined contract level parameters on ACTIVE accounts by posting EVER GREEN MAINTENANCE non-monetary transaction in Customer Service > Maintenance > Transaction Batch Information section.
Note that, a lease account can be manually converted to Evergreen lease by posting ‘Evergreen Lease Transaction’ monetary transaction and Evergreen Lease in OFSLL is supported only for INTEREST RATE type of lease calculation method.
To post Evergreen Maintenance
Transaction |
Parameters |
EVER GREEN MAINTENANCE |
TXN DATE Select the transaction date from adjoining calendar. |
|
EVERGREEN AUTO POST ON MATURITY IND Select either YES or NO from the drop-down list to allow system to auto post evergreen lease transaction on maturity date + evergreen grace days. Note: On selecting this check box, the ‘Auto Include Residual Value’ option is disabled. |
|
EVERGREEN NO OF UNPAID BILLS Specify a value. Auto renewal of contract to evergreen lease is allowed only when actual number of unpaid bills is greater than the specified value. |
|
EVERGREEN UNPAID BILLS PERCENTAGE Specify the percentage (0 - 100) of total unpaid bills remaining for system to consider for auto renewal of contract to evergreen lease. System uses the greater of these two values i.e. Number of Unpaid Bills and Unpaid Bills % |
|
EVERGREEN PAYMENT AMOUNT METHOD Select one of the following payment amount method from drop-down list which is to be accounted for billing on auto renewal of contract to evergreen lease. This is the rental amount for asset usage. - % on Maturity Bill - Percentage of lease payment amount as on maturity. - Fixed Amount - Fixed lease amount |
|
EVERGREEN VALUE Specify the value to derive the asset usage billing amount based on any of the above Payment Amount Method. |
|
EVERGREEN GRACE DAYS Specify the total number of grace days allowed after maturity for system to consider for auto renewal of contract to evergreen lease |
|
EVERGREEN EXTENSION TERM Specify the new extension term which is the agreed term between customer and financial institution. This term is mapped to extension term of EVER GREEN LEASE monetary transaction. |
This transaction is posted ‘Only’ after contract date and before maturity date + grace days (i.e. the transaction date > Contract Date and Transaction Date <= Maturity Date + Ever Green Grace Days).
On successfully posting the transaction, a confirmation message is displayed in the Results section indicating the date on which the transaction is posted. The details are updated to Account Information screen and overrides the existing parameters (if any) propagated from Origination on funding the account.
When Evergreen lease transaction is posted on existing lease account and on renewal, the lease account is extended up to the term specified and is billed as per the agreed ‘Payment Amount’ for extended term. Also the ‘Rate’ and ‘Residual %’ of the existing lease are updated to ‘0’ and existing balances are closed by either posting an adjustment minus transaction to the account or collecting the payment from customer.
If there is any change required in payment amount after the contract is renewed to ever green mode, post LS_CHANGE_PMT_AMT (Lease Change Payment Amount) transaction to update the Payment Amount.
However, if required an Evergreen lease contract can be terminated anytime once evergreen billing has been started.
A.2.49 Stop Correspondence at Account Level
All the active customer/business accounts in Oracle Financial Services Lending and Leasing are enabled to receive correspondence by default. However, if required you can choose to stop the correspondence from the system.
Apart from stopping correspondence to all accounts at customer/business level as done by posting Customer/Business Correspondence (stopping) non-monetary transaction, you can choose to stop the correspondence to a particular customer account and continue the correspondence to remaining accounts. On doing so, that particular account is excluded from ODD batch job and does not receive correspondence of any kind such as letters or monthly statements from the system.
If ‘Customer Stop Correspondence’ is already posted on the account, system does not allow to post ‘Account Stop Correspondence’ and displays an error indicating ‘Customer Stop Correspondence' is already posted on the account’.
Individual account level correspondence can be stopped by posting ACCOUNT STOP CORRESPONDENCE (ACC_STOP_CORR_MAINT) non-monetary transaction in Customer Service > Maintenance > Transaction Batch Information section.
To stop account correspondence
Transaction |
Parameters |
ACCOUNT STOP CORRESPONDENCE (ACC_STOP_CORR_MAINT) |
TXN DATE Select the transaction date from adjoining calendar. |
ACCOUNT STOP CORR INDICATOR Select either YES or NO from the drop-down list to toggle account correspondence. |
|
PROCESS MASTER ASSOCIATED ACCOUNTS Select either Yes or No from the drop-down list. Selecting ‘Yes’ posts the transaction to Master Account and Associated Accounts and selecting ‘No’ posts the transaction to Current Account. |
|
PROCESS SAME PRODUCT TYPE AND FUNDING TYPE ACCOUNTS Select either Yes or No from the drop-down list. Selecting ‘Yes’ posts the transaction on its Master Account and Associated accounts belonging to the same product and funding type. Selecting ‘No’ posts the transaction to Master and all its associated accounts. |
|
STATEMENT CONSOLIDATION INDICATOR Select either Yes or No from the drop-down list to update the Statement Consolidation indicator flag in Customer Service > Account Details > Other section. Selecting ‘Yes’ along with PROCESS MASTER ASSOCIATED ACCOUNTS = Y, posts the transaction to Master and all the Associated accounts having Statement Consolidation = Y. On, selecting ‘No’ along with PROCESS MASTER ASSOCIATED ACCOUNTS = Y, system ignores statement consolidation flag and posts the transaction to Master and all the Associated accounts. |
|
REASON CODE Select the reason for posting this transaction from the drop-down list. |
|
COMMENTS Specify additional information (if any). |
On successfully posting the transaction, a confirmation message is displayed in the Results section indicating the date on which the transaction is posted and the Stop Correspondence check box is selected in the Customer Service screen’s Account Information screen.
![]()
Note
- If a Master account has stop correspondence as Yes, then new accounts on-boarded with Statement Consolidation Flag Y will also have stop correspondence as Yes. Same is the case when an Associate account is moved/Swapped from Master Account.
- If individual account level 'Stop Correspondence' exists then such account is excluded from Master Account/Customer level Statement consolidation.
To remove the Stop Correspondence indicator, follow the above procedure and update the ‘ACCOUNT STOP CORR INDICATOR’ as ‘NO’.
A.2.50 Consolidated Payoff Quote
You can generate a consolidated payoff quote for any combination of Master and its associated accounts which includes the consolidated amount owed on all selected accounts. A payoff quote can either be generated for current or future date, but not on a back date.
However, you can also generate a payoff quote for individual account. For information on how to generate a payoff quote on individual account, refer to ‘Payoff Quotes’ section
Consolidated Payoff Quote can be generated anytime by posting CONSOLIDATED PAYOFF QUOTE (PAYOFF_CONSOLIDATE) non-monetary transaction in Servicing > Customer Credit Limit > Transactions tab.
To generate Consolidated Payoff Quote
Transaction |
Parameters |
CONSOLIDATED PAYOFF QUOTE |
TXN DATE Select the transaction date from adjoining calendar. |
PAYOFF QUOTE VALID UPTO DATE Select the date till when the payoff quote is valid from adjoining calendar. System calculates Accrued Interest on account till the date specified. |
|
PAYOFF QUOTE LTR PRINT Select either YES or NO from drop-down list. If selected as YES, then a Payoff Quote Letter with specific format is generated. The value of parameters in the letter are fetched from variables defined in the configuration. |
|
COMMENTS Specify additional information (if any). |
|
ACCOUNT NUMBER Specify the required accounts separated by comma. This can have a combination of both Master and its Associated accounts. |
|
LEASE BUYOUT INDICATOR This parameter is applicable for Lease Account only. Select either YES or NO from drop-down list to indicate if the lease contract is available for buyout option. |
On successfully posting the transaction, a confirmation message is displayed in the Results section indicating the date on which the transaction is posted along with below details:
- The TOTAL PAYOFF QUOTE IN section indicates currency-wise consolidation payoff quote i.e. if multiple accounts are selected for consolidation with different currencies, then consolidation is listed for accounts with same currency and subsequently for other/individual currencies.
- Subsequently, individual payoff quote is generated and displayed for each of the Associated account selected along with Master account payoff quote (if selected).
A.2.51 Terminate Single/Multi Lease Account(s)
You can terminate single or multiple lease accounts for any combination of Master and its associated accounts in a single transaction. During this process, either some or all assets leased under one master contract can be terminated. However, termination transaction is allowed only for Lease Closed-ended accounts only.
While initiating a lease contract termination transaction before the maturity date, system validates and allows termination only if either the Billed Term or Lease Amount Recovered % is met.
Single/Multi Lease Account(s) Termination transaction can be generated anytime by posting TERMINATE MULTI ACCOUNT (TERMINATE_MULTI) non-monetary transaction in Servicing > Customer Credit Limit > Transactions tab.
To generate Single/Multi Lease Account(s) Termination transaction
Transaction |
Parameters |
TERMINATE MULTI ACCOUNT |
TXN DATE Select the transaction date from adjoining calendar. |
LEASE BUYOUT INDICATOR Select either YES or NO from drop-down list to indicate if the lease contract is available for buyout option. |
|
ACCOUNT NUMBER Specify the required accounts separated by comma. This can have a combination of both Master and its Associated accounts. |
|
COMMENTS Specify additional information (if any). |
On successfully posting the transaction, a confirmation message is displayed in the Results section indicating the status of Success/Failed transaction(s) posted. In case of Failed transactions, the reason is indicated separately.
A.2.52 Add New Customer
During the servicing stage of an account, you can add customer details into the system by posting ADD NEW CUSTOMER transaction in Customer Service > Maintenance > Transaction Batch Information section.
![]()
Before creating the transaction, ensure that ADD NEW CUSTOMER transaction is enabled in Transaction Codes setup screen and is allowed to post based on your user privileges.
While adding, you can also set the customer relation as primary to the account by selecting the appropriate RELATION TYPE CODE. Once added, the same becomes the current/primary customer and the current indicator is set to ‘Y’ by default. Also the address details of an existing current/primary account is updated to new customer details. However, if there is a different address to be updated, the same can be done by posting ADD CUSTOMER ADDRESS PHONE non-monetary transaction.
To add customer details
Transaction |
Parameters |
ADD NEW CUSTOMER (CUS_ADD_MAINT) |
CUSTOMER NUMBER Specify the new customer number. |
TXN DATE Select the transaction posting date from the adjoining calendar. |
|
|
RELATION TYPE CODE Select the account relation type (Primary, Spouse, and so on) from the drop-down list which are attached to account. |
|
CUSTOMER FIRST NAME Specify the first name of the customer. |
|
CUSTOMER MIDDLE NAME Specify the middle name of the customer. |
|
CUSTOMER LAST NAME Specify the last name of the customer. |
|
CUSTOMER SSN Specify customer’s social security number. |
|
CUSTOMER BIRTH DATE Specify customer’s birth date from adjoining calendar. |
|
CUSTOMER NUMBER OF DEPENDENTS Specify the number of dependants for the customer. |
|
CUSTOMER LANGUAGE CODE Select the customer language code from the drop-down list. |
|
CUSTOMER MARITAL STATUS CODE Select the customer marital status from drop-down list. |
|
CUSTOMER DRIVING LICENSE NUMBER Specify the customer driving license number. |
|
CRB ECOA CODE Select the credit bureau’s Equal Credit Opportunity Act code from where the customer credit score is received from the drop-down list. |
|
CUSTOMER GENDER CODE Select the customer gender code from the drop-down list. |
|
CUSTOMER DISABILITY INDICATOR Select the customer disability indicator as either Yes or No from the drop-down list. |
|
CUSTOMER SKIP INDICATOR Select the customer skip indicator as either Yes or No from the drop-down list. |
|
CUSTOMER STOP CORR INDICATOR Select the customer stop correspondence indicator as either Yes or No from the drop-down list. |
|
CUSTOMER CLASS TYPE CODE Select the customer class type code from the drop-down list. |
|
CUSTOMER ENABLED INDICATOR Select the customer enabled indicator as either Yes or No from the drop-down list. |
|
CUSTOMER CHRISTIAN NAME Specify the customer Christian name. |
|
CUSTOMER FULL NAME Specify customer’s full name. |
|
PRIVACY OPTOUT Select the customer’s privacy optout indicator as either Yes or No from the drop-down list. |
|
CUSTOMER PASSPORT NUMBER Specify the customer’s passport number. |
|
CUSTOMER PASSPORT ISSUE DATE Select the customer’s passport issue date from adjoining calendar. |
|
CUSTOMER PASSPORT EXPIRY DATE Select the customer’s passport expiry date from adjoining calendar. |
|
CUSTOMER NATIONAL ID Specify the customer national id. |
|
VISA NUMBER Specify customer visa number. |
|
NATIONALITY CODE Select the nationality code from the drop-down list. |
|
PAYMENT HIERARCHY Specify the payment hierarchy code. |
|
CATEGORY CODE Select the customer category code from the drop-down list. |
On successfully posting the transaction, a confirmation message is displayed in Result section and the details are populated in Customer Service > Customer Details tab.
A.2.53 Add/Update customer Address
You can update the address details of an existing customer details maintained in the system by posting ADD CUSTOMER ADDRESS PHONE transaction in Customer Service > Maintenance > Transaction Batch Information section.
![]()
Before creating the transaction, ensure that ADD CUSTOMER ADDRESS PHONE transaction is enabled in Transaction Codes setup screen and is allowed to post based on your user privileges.
To add/update customer details
Transaction |
Parameters |
ADD CUSTOMER ADDRESS PHONE(CUS_ADR_PH_MAINT) |
TXN DATE Select the transaction posting date from the adjoining calendar. |
RELATION TYPE CODE Select the relation to which the address is being updated from the drop-down list. |
|
ADR ADDRESS TYPE CODE Select the address type from the drop-down list. |
|
ADR PHONE Specify the phone number. |
|
ADR MAILING INDICATOR Select the mailing indicator as either Yes or No from the drop-down list. |
|
|
ADR POSTAL ADDRESS TYPE CODE Select the postal address type from the drop-down list. |
|
ADR ADDRESS NUMBER Specify the address number. |
|
ADR STREET PRE TYPE CODE Select the street name prefix type from drop-down list. |
|
ADR STREET NAME Specify the street name. |
|
ADR STREET TYPE CODE Select the street type from the drop-down list. |
|
ADR STREET POST TYPE CODE Select the street post type from the drop-down list. |
|
ADR APARTMENT NUMBER Specify the apartment number. |
|
ADR ADDRESS2 Specify the additional address details. |
|
ADR CITY Specify the city. |
|
ADR STATE CODE Select the state from the drop-down list. |
|
ADR ZIP Select the zip code from the drop-down list. |
|
ADR ZIP EXTENSION Specify the extension of the zip code. |
|
ADR COUNTRY CODE Select the country code from the drop-down list. |
|
ADR COMMENT Specify additional details (if any) as comment. |
|
ADR CENSUS TRACT/BNA CODE Specify the Census Tract or Block Numbering Area code. |
|
ADR MSA CODE Specify the metropolitan statistical area (MSA) code. |
|
PERMISSION TO CALL IND Select the permission to call indicator as either Yes or No from the drop-down list. |
On successfully posting the transaction, a confirmation message is displayed in Result section and the details are populated in Customer Service > Customer Details > Address Information sub tab.
A.2.54 Agreement Number Maintenance
During the serving stage of an account, you can move the agreement number from one account to another and/or perform other maintenance activities such as add/update or remove the agreement number. This agreement number helps to group all those accounts with a particular agreement number.
You can add/update or remove the agreement number associated to an account by posting AGREEMENT_NUMBER_MAINT (AGREEMENT NUMBER MAINTENANCE) non-monetary transaction in Customer Service > Maintenance > Transaction Batch Information section.
To add/update/remove agreement number
Transaction |
Parameters |
AGREEMENT_NUMBER_MAINT (AGREEMENT NUMBER MAINTENANCE) |
AGREEMENT # Specify the new or revised agreement number which is to be associated to the account. To remove existing agreement number, specify the value as NULL. |
TXN DATE Select the transaction posting date from the adjoining calendar. |
On successfully posting the transaction, a confirmation message is displayed in Result section and the agreement number is populated in both Account Details > Account Information and Contract Information tab.
A.2.55 Sale Order Number Maintenance
Sales Order Number is an unique number created to capture the sale of Products & Services specifically in ERP systems. In OFSLL, a Sales Order Number may be associated to multiple Accounts which in-turn helps to group all those accounts with the same sales order number.
If Sales Order Number is not associated to an account while funding or if the same is updated as Null or blank, you can add/update/remove the Sales Order Number to the account by posting SALES_ORDER_MAINT(SALES ORDER NUMBER MAINTENANCE) non-monetary transaction in Customer Service > Maintenance > Transaction Batch Information section.
To add/update/remove Sales Order Number
Transaction |
Parameters |
SALES_ORDER_MAINT (SALES ORDER NUMBER MAINTENANCE) |
TXN DATE Select the transaction posting date from the adjoining calendar. |
SALES ORDER NBR Specify the unique Sales Order Number which is to be associated to the account. You can enter a unique alpha-numeric number up to 80 characters. |
On successfully posting the transaction, a confirmation message is displayed in Result section and the Sales Order Number is populated to Customer Service > Account(s) header section.
A.3 Processing SCRA
SCRA (Servicemembers Civil Relief Act) is a United States federal law that protects soldiers, sailors, airmen, Marines, Coast Guardsmen, commissioned officers in the Public Health Service and National Oceanic and Atmospheric Administration, from being sued for payment defaults.
The system is facilitated to be compliant with these SCRA laws. The following features are supported:
- Interest Rate Limitation, Prevention of Acceleration of Principal during Borrower's Military Duty
- Fees, Bankruptcy & Deferment rules applicable during Military Duty by the Account holder/Borrower
- Reverting to pre-SCRA terms when Account holder/Borrower is OFF Military Duty
- Validations with respect to Account holder/Borrower reporting Military Duty and
- Validations with respect to Guarantor being on Military Duty.
To be compliant with the above SCRA features, you can setup;
- Transaction Posting checks
- Related configurations OFF MILITARY DUTY through a transaction which will revert to original contractual terms for payment amount, interest rate and term.
Post the ‘OFF MILITARY DURY’ date, if payment is missed as per contracted billing cycle, delinquency fee transaction is posted separately.
However, delinquency fees will not be applied for period of Borrower's Military duty.
A.3.1 Setting up Interest Rate for SCRA
You can define different interest rate which will be an input parameter for the ON ACTIVE MILITARY DUTY transaction. The system enables you to override default rate values with the values you define. However, if the values are not overridden, then system will pick the transaction from system parameter TPE_SCRA_DEFAULT_INTEREST_RATE.
The system will apply lowest rate between contract and system default interest rate. However, you can indicate to override the Rate with one entered in the transaction input parameter.
Access to the transaction and availability of the Override and Rate parameters are setup in Transaction Codes Access Grid and Parameters, respectively.
When the transaction is under BORROWER ON ACTIVE MILITARY DUTY status, the system facilitates setting up and validating the following:
- While posting On Military Duty transaction, provides flexibility to choose the Fee to be applicable through Fee Assessment Access Grid, based on On Military Duty account condition created in the account.
- You can not initiate Foreclosure / Repossession activities on active military duty accounts.
- The monthly payment amount must not exceed the existing payment amount.
- During deferment period, enables you to define 'NO Interest to be charged' by defining 'Stop Accrual' to the 'EXTENSION transaction' for the same terms of Extension. A batch job re-starts Interest Accrual, once the system posts comments for the same
Once the OFF MILITARY DUTY transaction is posted on account, system facilitates setting up and validating the following:
- The contractual terms are returned once the SCRA condition is removed. That is, the payment amount, terms, and interest rate must revert to their pre-SCRA state. Thus, resulting in a balloon payment at the end of Lease.
- To extend On Military Duty benefits, you can perform any of the following:
- OFF Military Duty transaction must not be posted
- If already posted, OFF Military Duty transaction must be REVERSED
- Close current Military Duty by posting the OFF transaction and then opening a new Duty period by posting the On Military Duty Transaction. Ensure not to overlap the periods.
Note the following for new accounts created on SCRA
If a borrower is on ‘Active Military Duty’ for an existing account and the same customer ID is used to create a new account, system by default does not provide SCRA benefits by updating the SCRA Interest Rate. Instead the account is created with Contract Interest Rate.
For SCRA Interest Rate to be effective on new account, the ‘Borrower on Military Duty’ transaction has to be posted explicitly. For more details, refer to ‘Active Military Duty’ section.
A.4 Black Book Interface
The system performs collateral valuation for all the active accounts at a set frequency. However, valuation is not performed for collaterals with account status <ACTIVE> and Asset Status <ACTIVE> and <PRIMARY>.
The source for the above valuation is Black book or any other Collateral Evaluator agency. These valuation details are stored for each collateral in Collateral tables. If an account has multiple collaterals, then the valuation details must be stored for each collateral.
You can run ‘BLACK BOOK INTERFACE’ batch to perform valuation for active accounts and active collaterals. This batch job performs the following:
- Validates for current valuation in the Black Book interface tables and gets the latest valuation
- After getting the valuation updates the collateral valuation with source as Source setup.
- Loads Black Book values
The system date is saved as Valuation Date along with other valuation details during batch run. Once the batch is run, black book values will load process to Oracle Valuation Section.